Deepsoccer
Introduction
There are currently various attempts to apply Deep Reinforcement to actual robot. The characteristics of Reinforcment Learning require over hundred of the initialization of the environment and many data for Deep Learning making it impossible to train the robot in the actual environment.
To overcome these difficulties, people first create a simulation that looks exactly like the real world. In this simulation, training is advanced for the virtual robot. Since then, many researches try to use the tranined model for an actual robot.
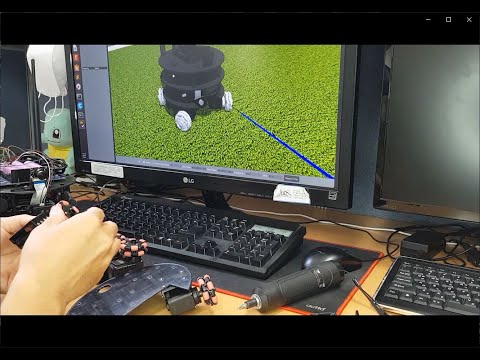
In this post, I’ll try to confirm these methods are actually working. The test uses a robot called Jetbot that has a GPU on its main board. And the environment is a soccer that is familiar to many people.
Code for that post can be found on the DeepSoccer Github.
 Project Introduction!
Table of Contents
Robot design
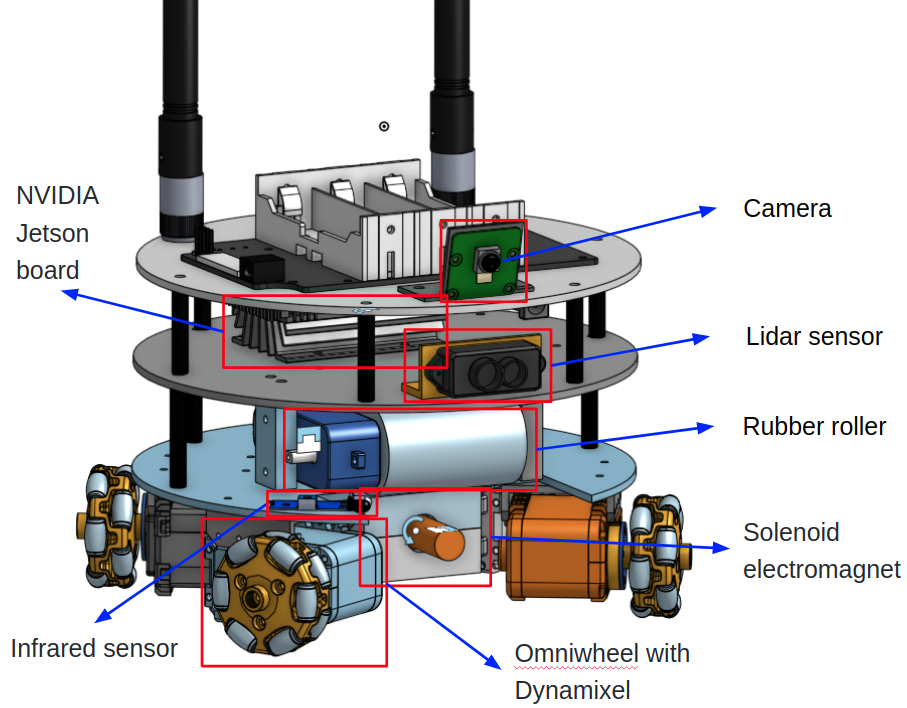
Unlike general driving robots, soccer robots need to move freely not only in front and behind, but also to the left and right. Furthermore, it is necessary to have the part for holding and kicking ball. In addition, embedeed board is needed which has a capacity for running 3 models of Deep Learning together.
 I use the Onshape cloud 3D modeling service to create a model.
You can see and download my 3D model.
After making 3D model, I convert it to URDF format for Gazebo simulation using onshape-to-robot.
Main Board
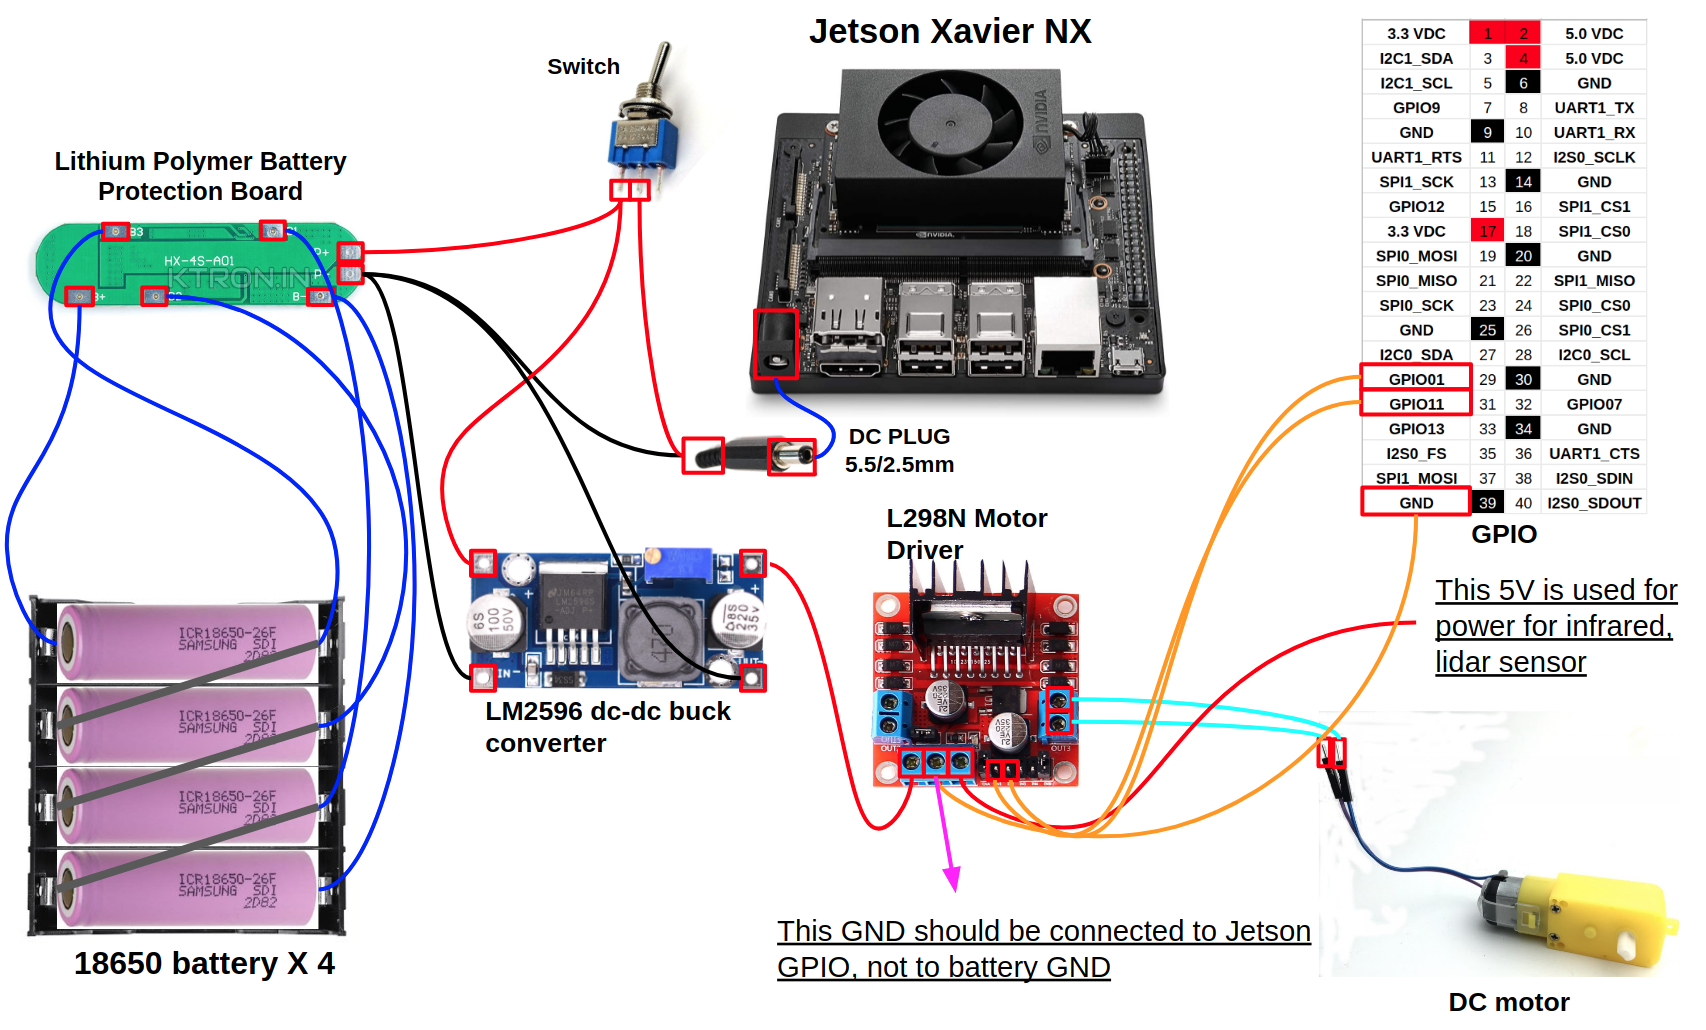
The main board used in DeepSoccer is Jetson Xavier NX which can run three Deep Learning model at the same time unlike Jetson Nano which can handle only one model one time. However, Jetson Xavier NX is little expensive compared to Jetson Nano.
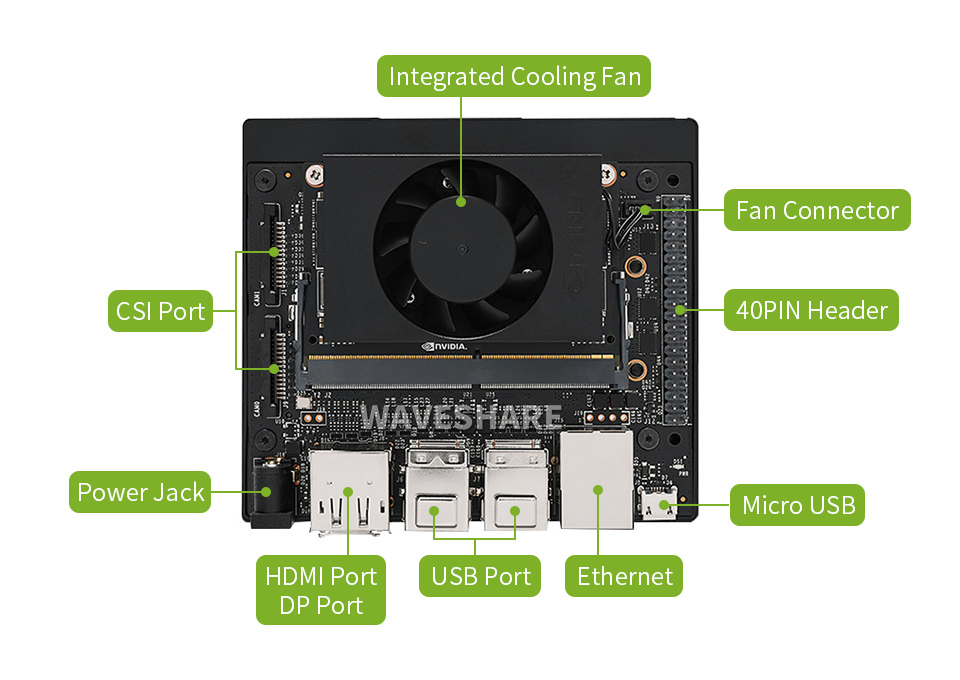
This board can run ROS, Python, and Tensorflow. Therefore, you can develop yout own application easily. It is also very convenient to use sensors and actuators as it supports almost all communication interfaces such as I2C, SPI, Digital input / output, CSI and USB.
Purchases can generally be made through Amazon. Unlike the Jetson Nano, which can be operated with three 18650 batteries, the Jetson Xavier NX requires four 18650 batteries to operate stably.
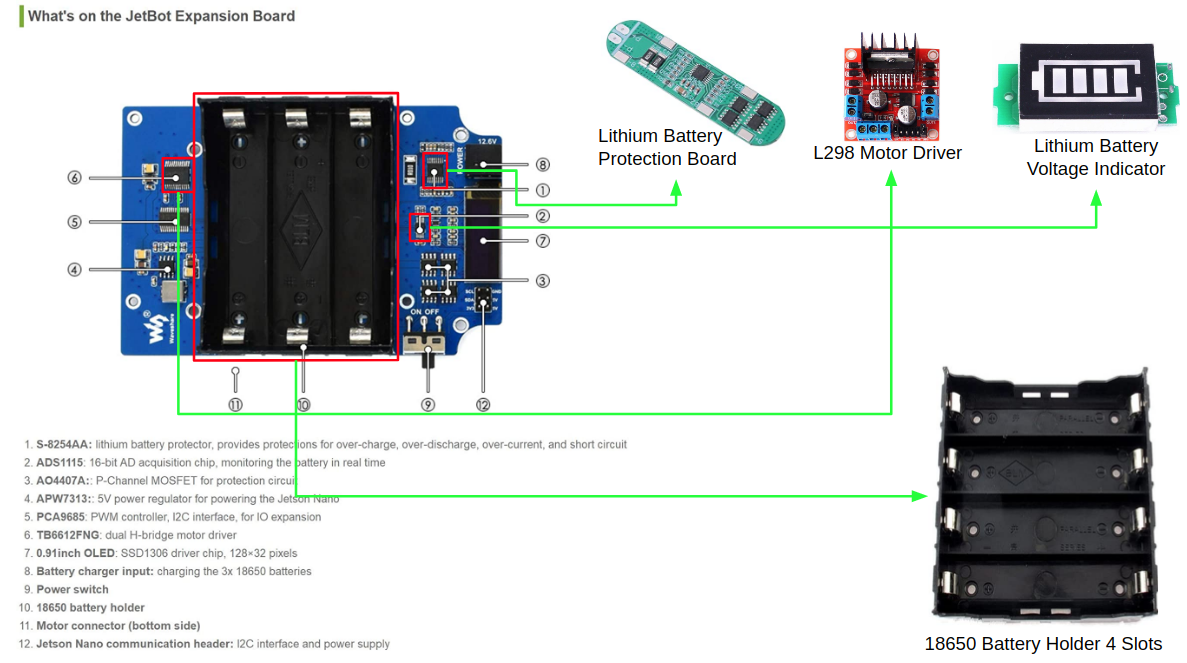
- 18650 Battery Holder 4 Slots
- Lithium Battery Protection Board
- Lithium Battery Voltage Indicator
- L298 Motor Driver
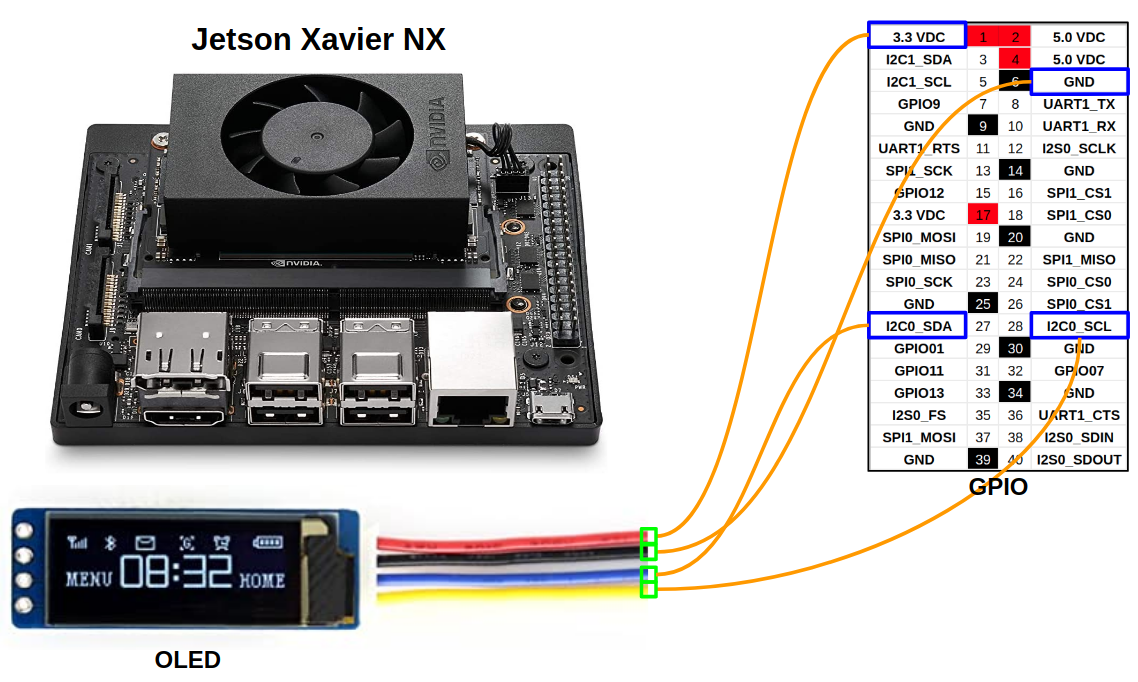
OLED
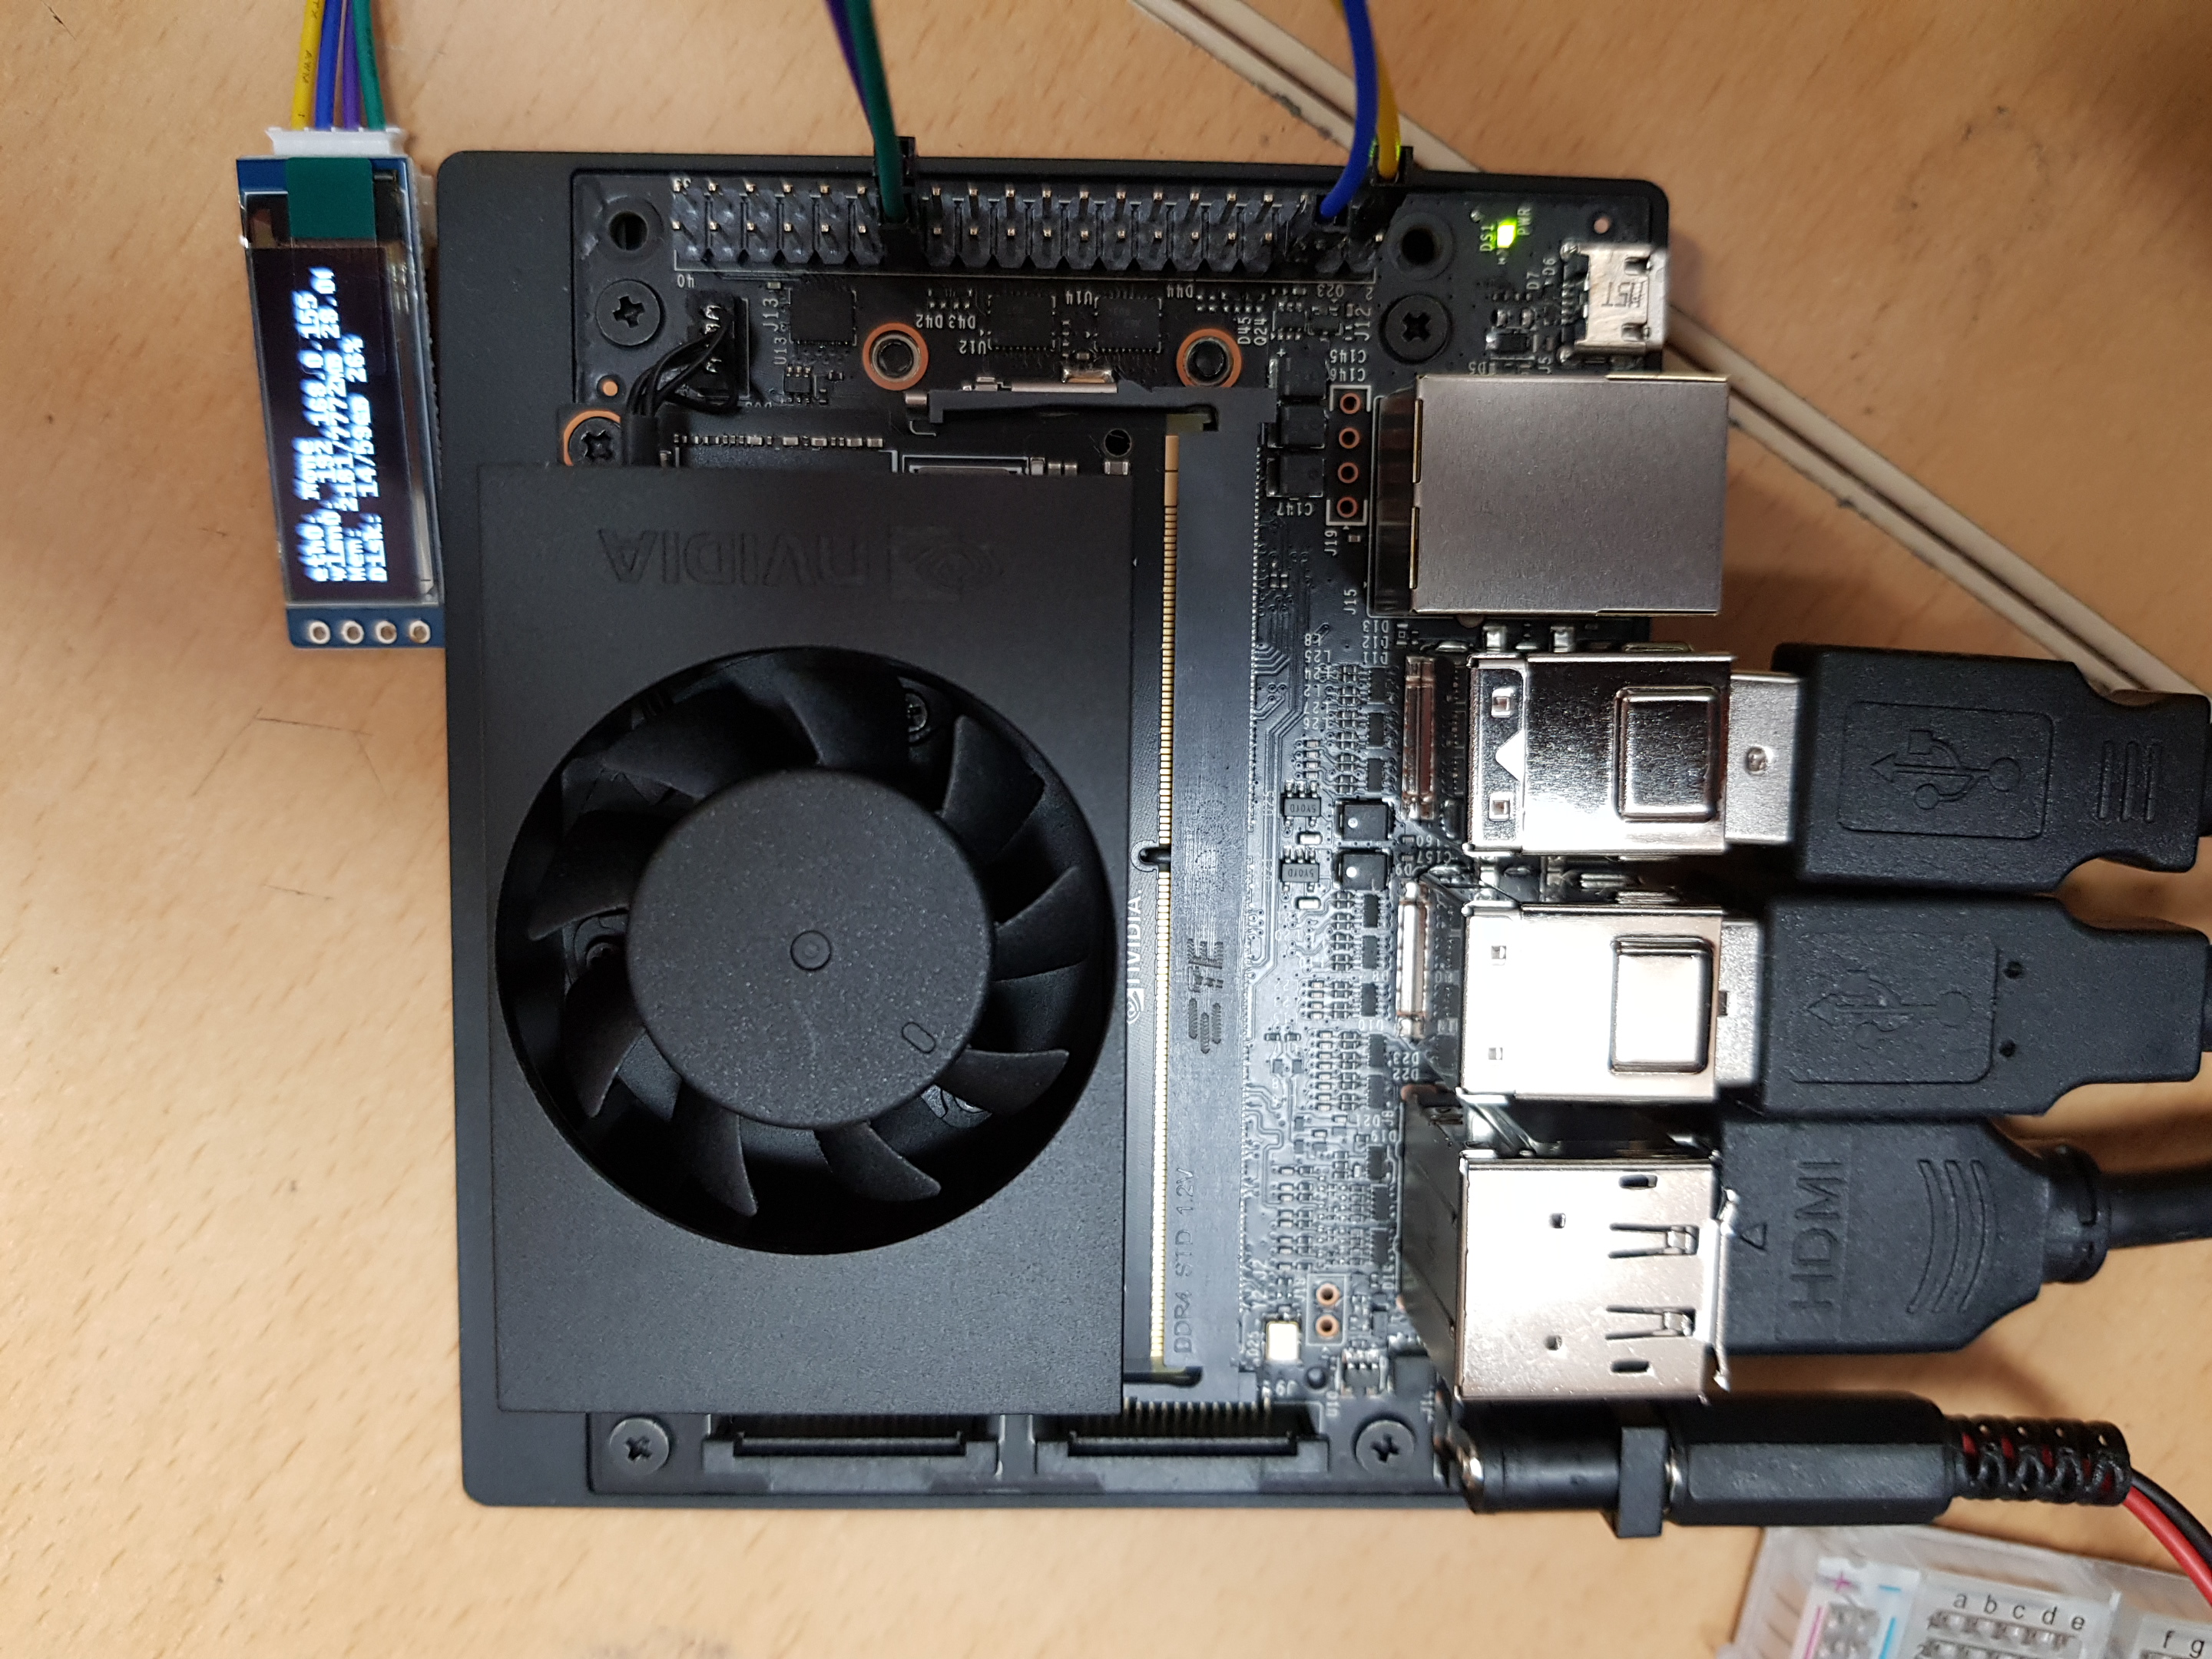
DeepSoccer has OLED display like an original Jetbot to monitor IP Address, memory usage without monitor connection.
Jetson Xavier NX is connected to OLED module by using VDC, GND and SCL, SDA of 0 Channel I2C.
After connecting the hardware, download the Jetbot package from https://github.com/NVIDIA-AI-IOT/jetbot to Jetson Xaiver NX and install it using setup.py file. In this package, execute a python file(https://github.com/NVIDIA-AI-IOT/jetbot/blob/master/jetbot/utils/create_stats_service.py) that displays the current information in OLED.
After that, try to register sevice to execut OLED file automatically when the board boot. First, move to /etc/systemd/system/ location of Ubuntu. Then, create a file named deepsoccer_stats.service with following contents.
[Unit]
Description=DeepSoccer stats display service
[Service]
Type=simple
User=kimbring2
ExecStart=/bin/sh -c "python3 /home/kimbring2/jetbot/jetbot/apps/stats.py"
Restart=always
[Install]
WantedBy=multi-user.target
Then, register the file as a service and start it as shown below.
$ systemctl daemon-reload
$ systemctl enable deepsoccer_stats
$ systemctl start deepsoccer_stats
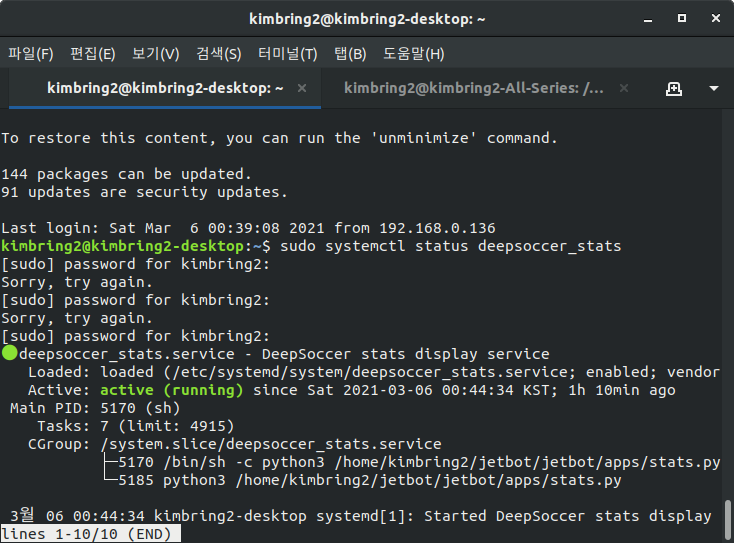
The registered service can be confirmed with the following command.
sudo systemctl status deepsoccer_stats
Jupyter Notebook
As with the original Jetbot, you can use a Jupyter Notebook to test a your code without connecting with monitor. First, insall Jupyter package and creates a configuration file using the following command.
$ pip3 install jupyterlab
$ jupyter notebook --generate-config
Next, open ipython and generate a hash to set the password.
$ ipython

In [1]: from IPython.lib import passwd

In [2]: passwd()
Enter password:
Verify password:
Out[2]: 'sha1:60f3ac9aec93:be2d6048e9b1e7ae0f1ccbad9d746734bf5c3797'
Next, record generated hash in the jupyter_notebook_config.json file created at previous step.
$ sudo vi ~/.jupyter/jupyter_notebook_config.json

c = get_config()
c.NotebookApp.ip = '0.0.0.0'
c.NotebookApp.open_browser = False
c.NotebookApp.port = 8080
c.NotebookApp.password = 'sha1:60f3ac9aec93:be2d6048e9b1e7ae0f1ccbad9d746734bf5c3797'
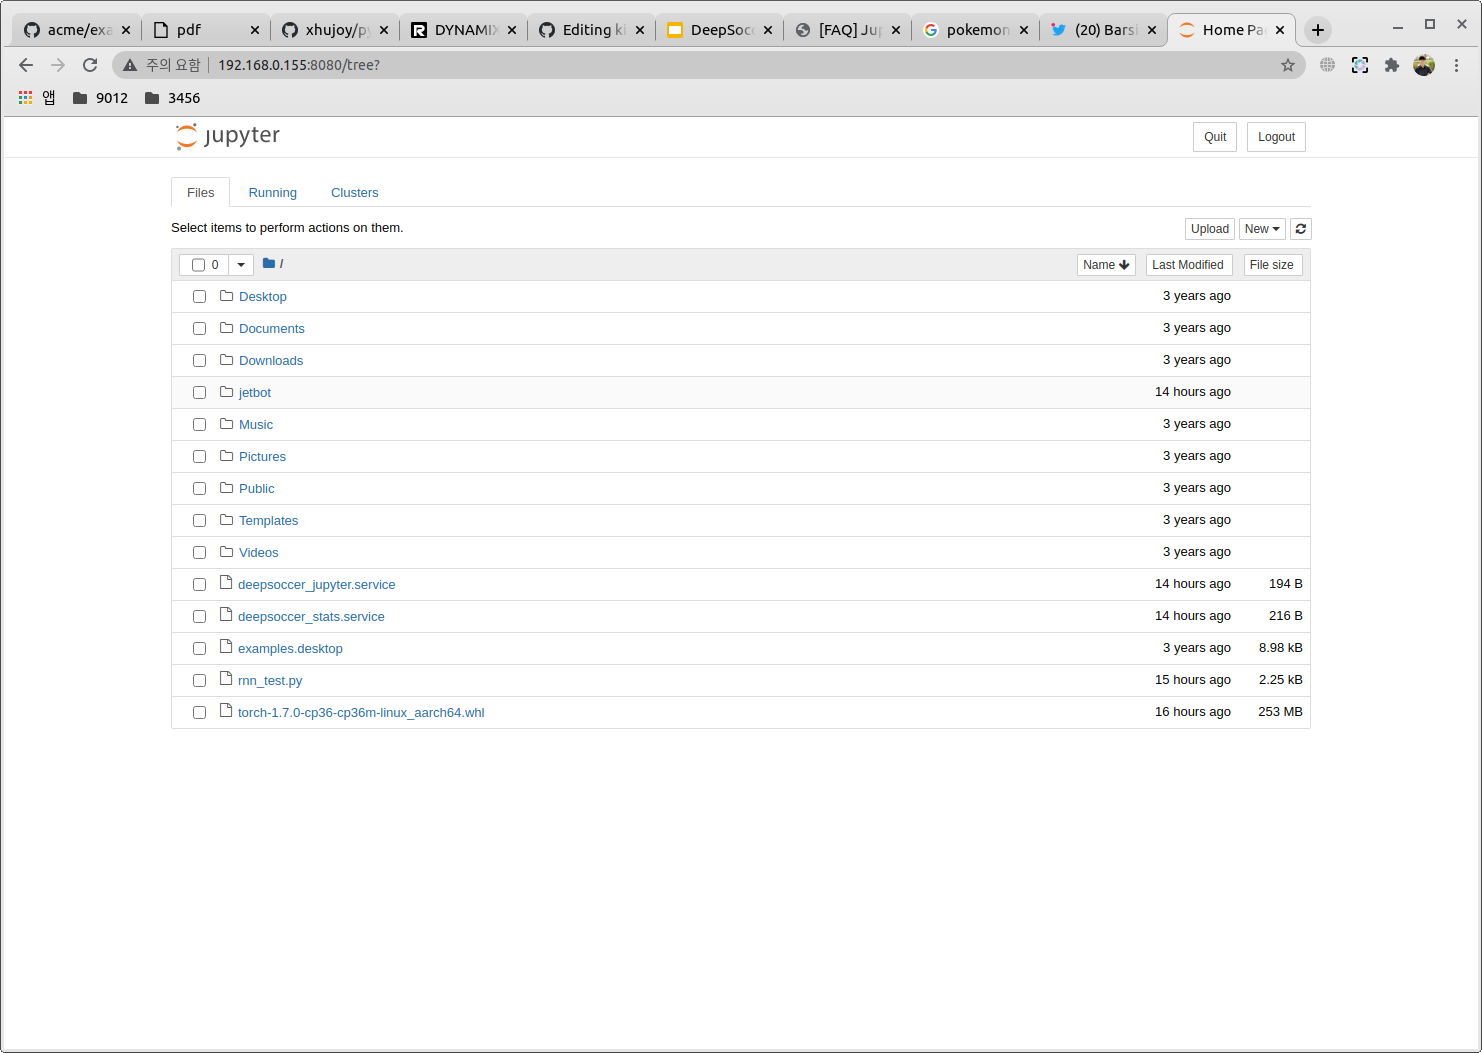
Finally, start Jupyter Notebook with the command below and enter the password you set earlier.
$ jupyter notebook
Wheel
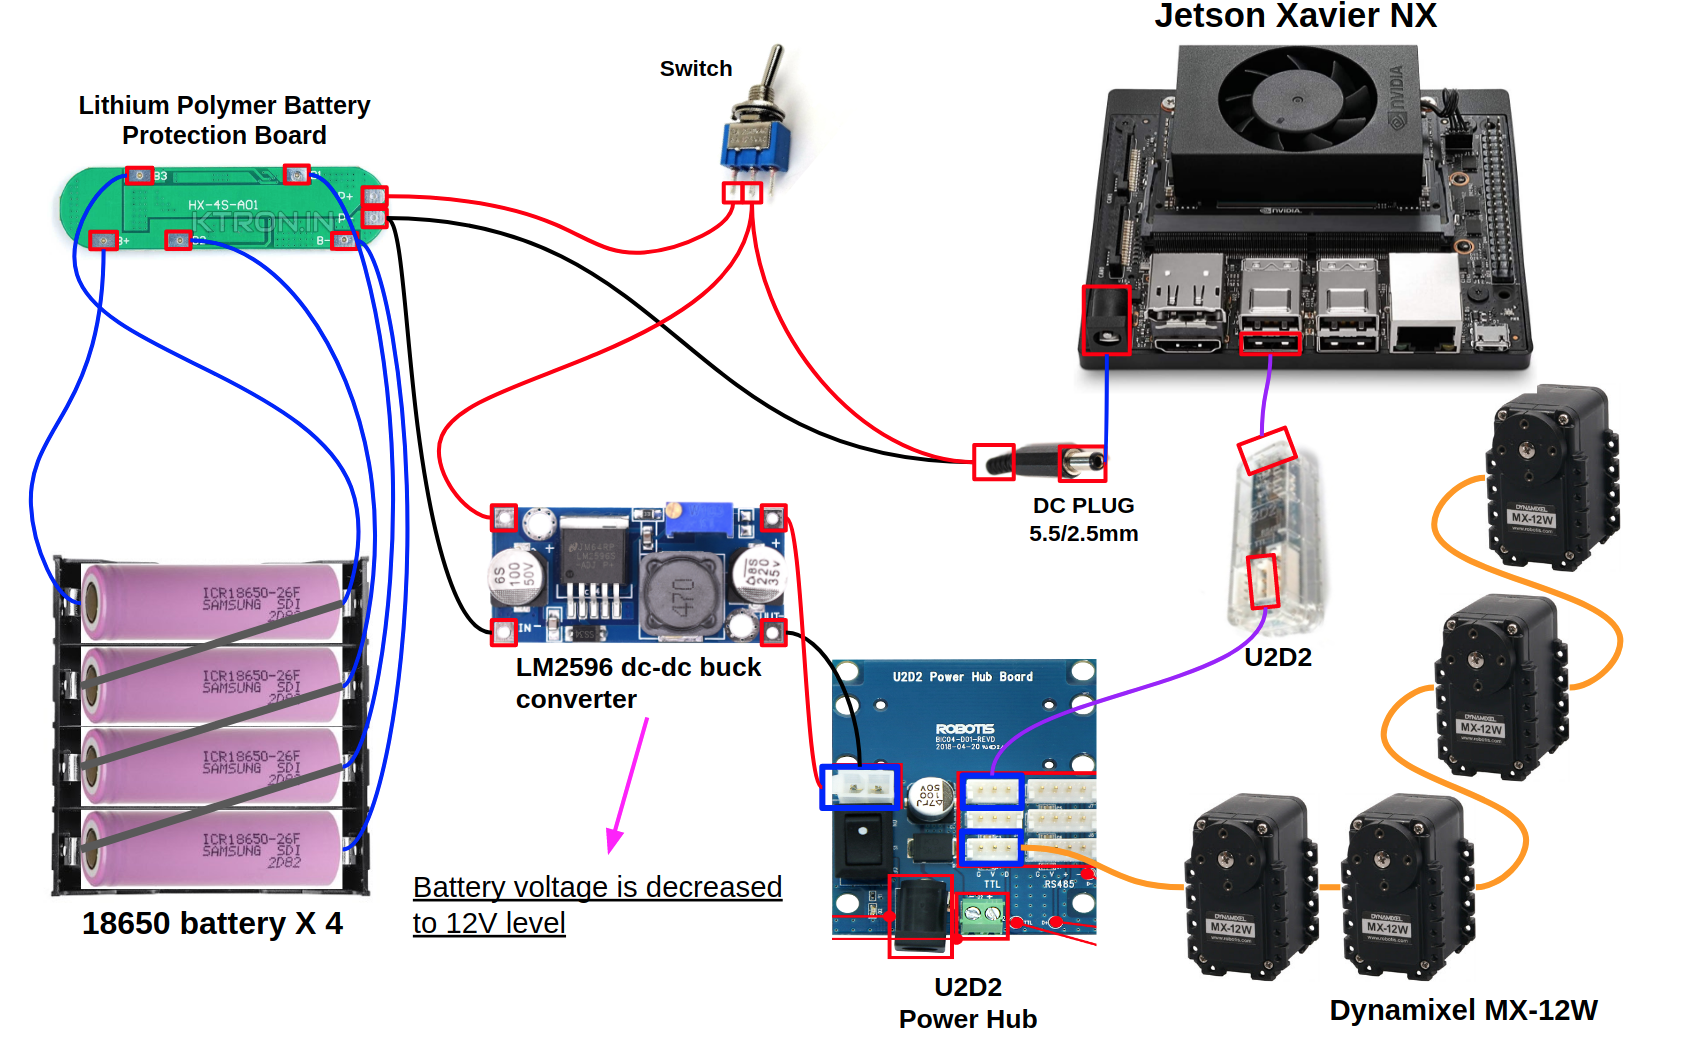
The U2D2 board and U2D2 power hub can be purchased at the Robotis shopping mall. However, if you have existing one, you can change only the 12V power supply method and use the rest as it is.
ID and communication method and firmware version of of Dynamixel can given via a program provided by ROBOTIS. I test a motor seperately before installing it to robot body. A power supply and TTL communication can be done by using a U2D2 board and power hub.
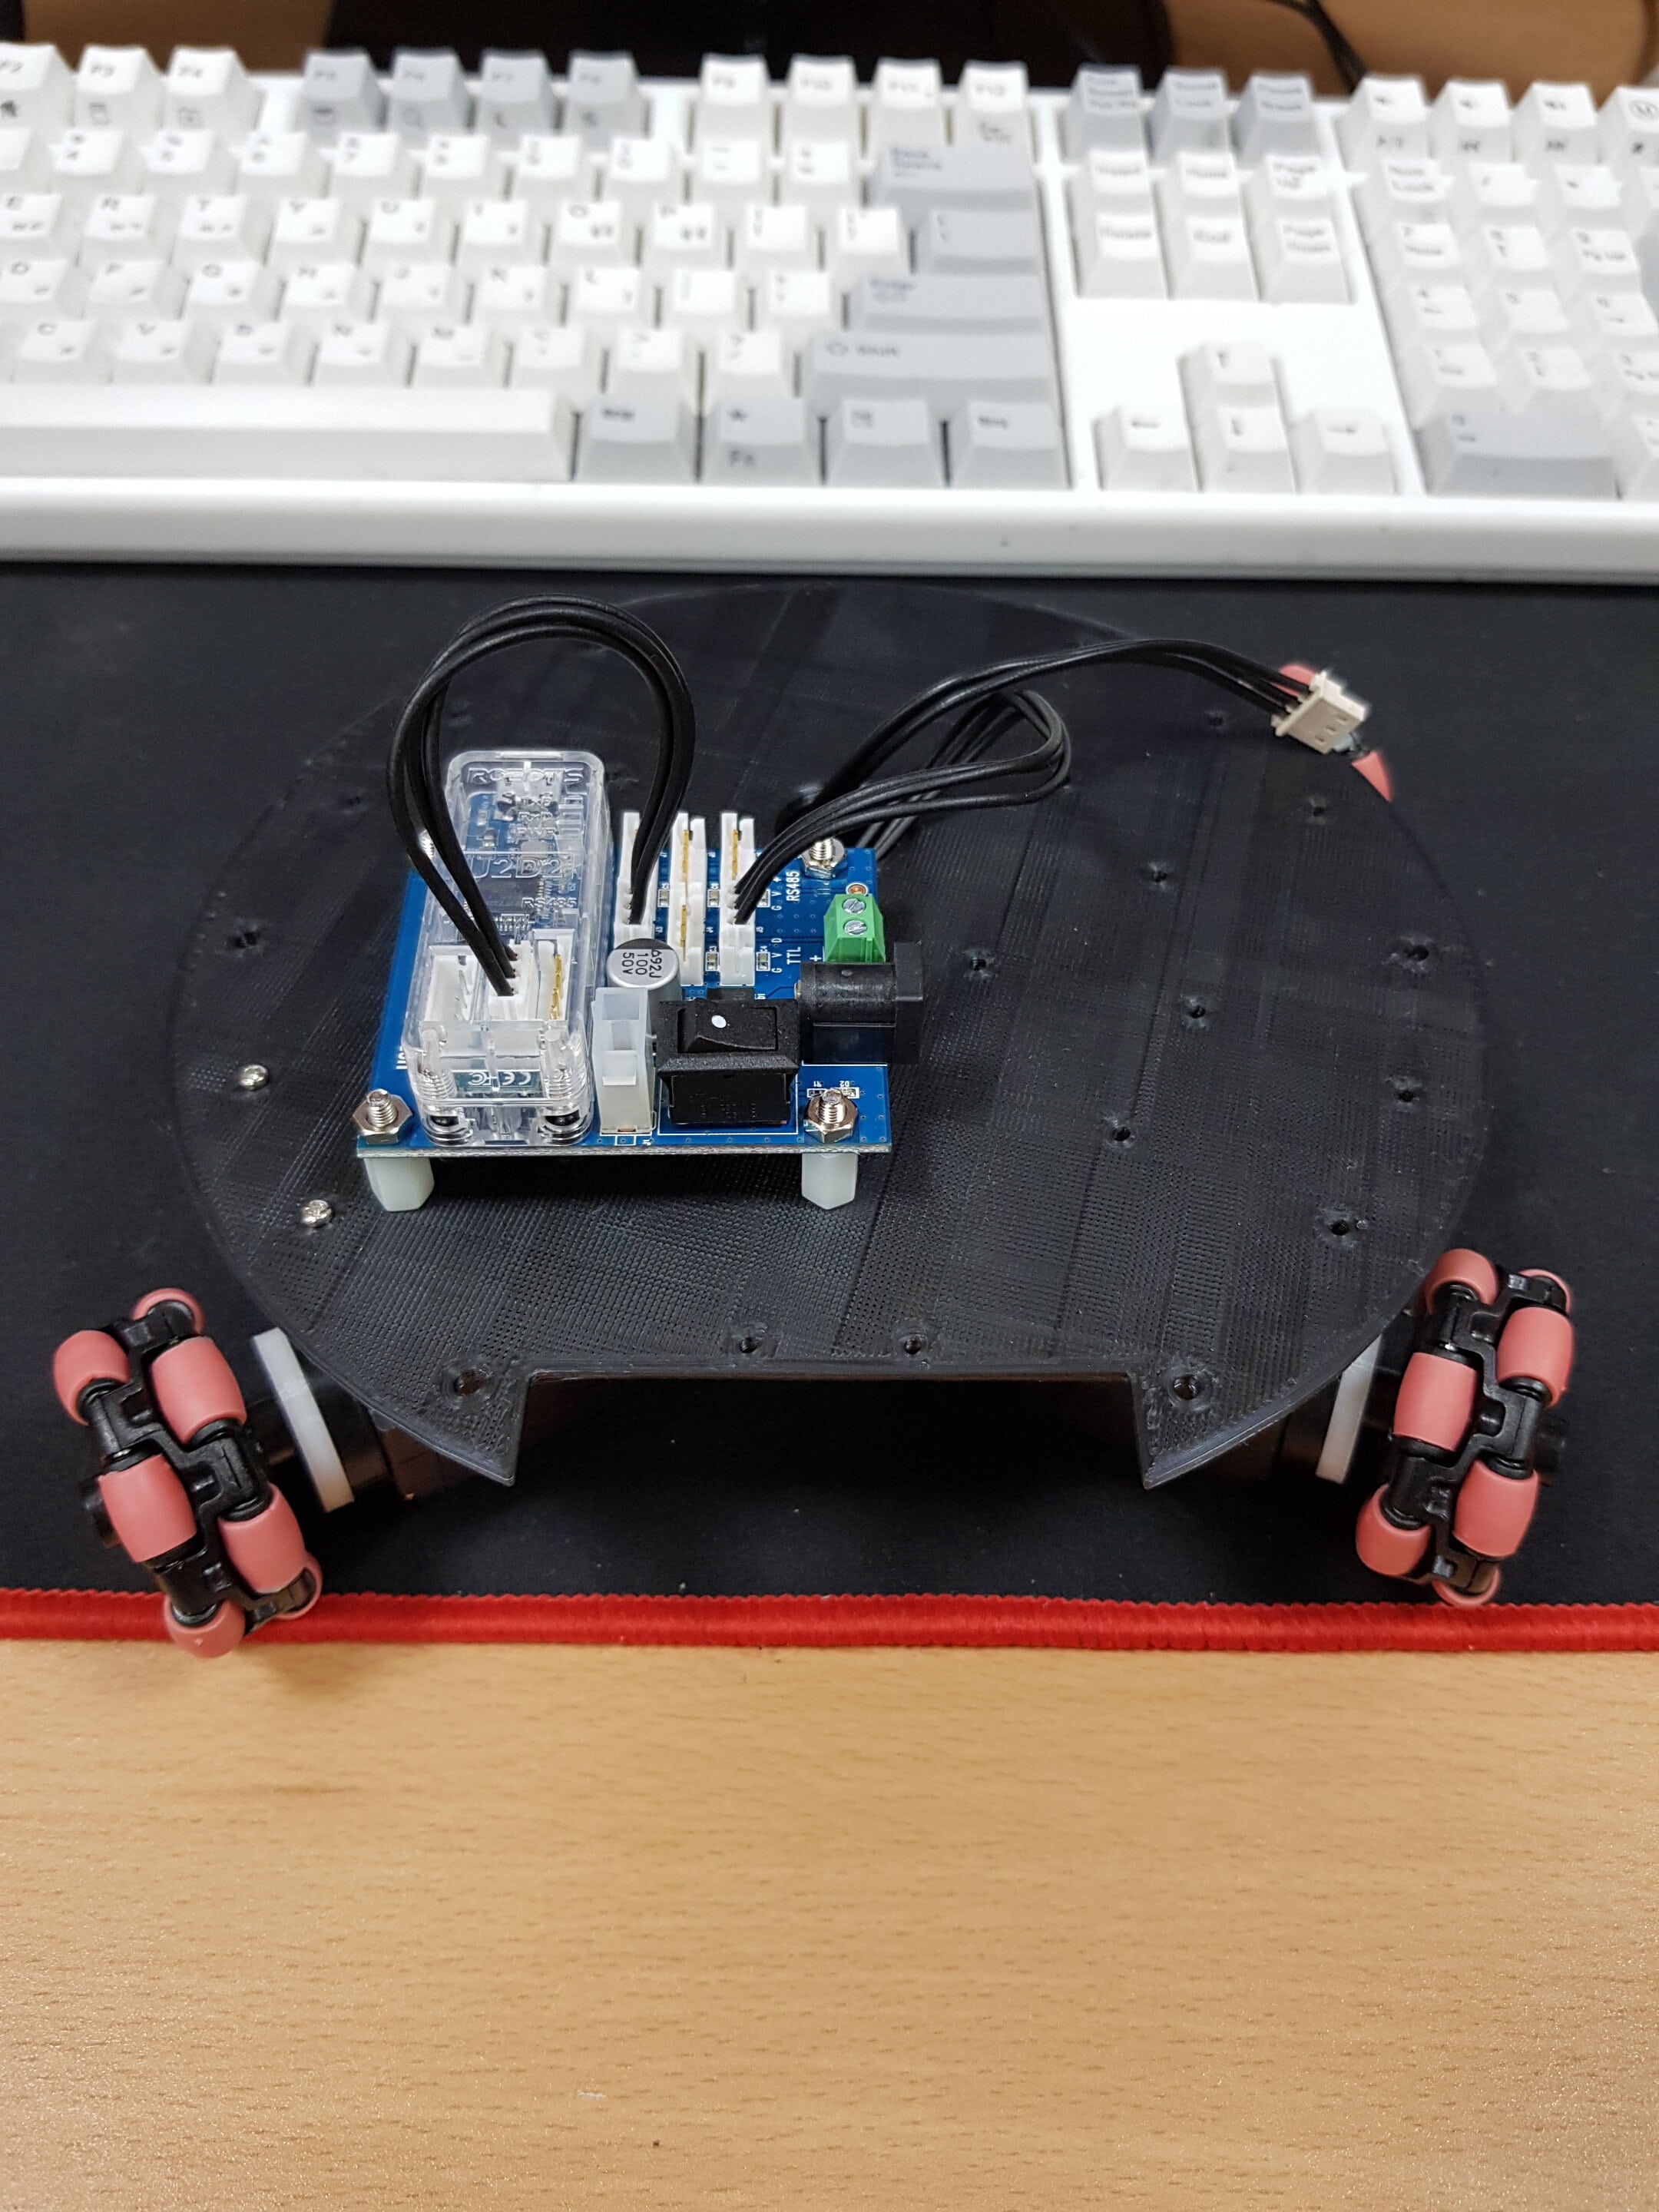
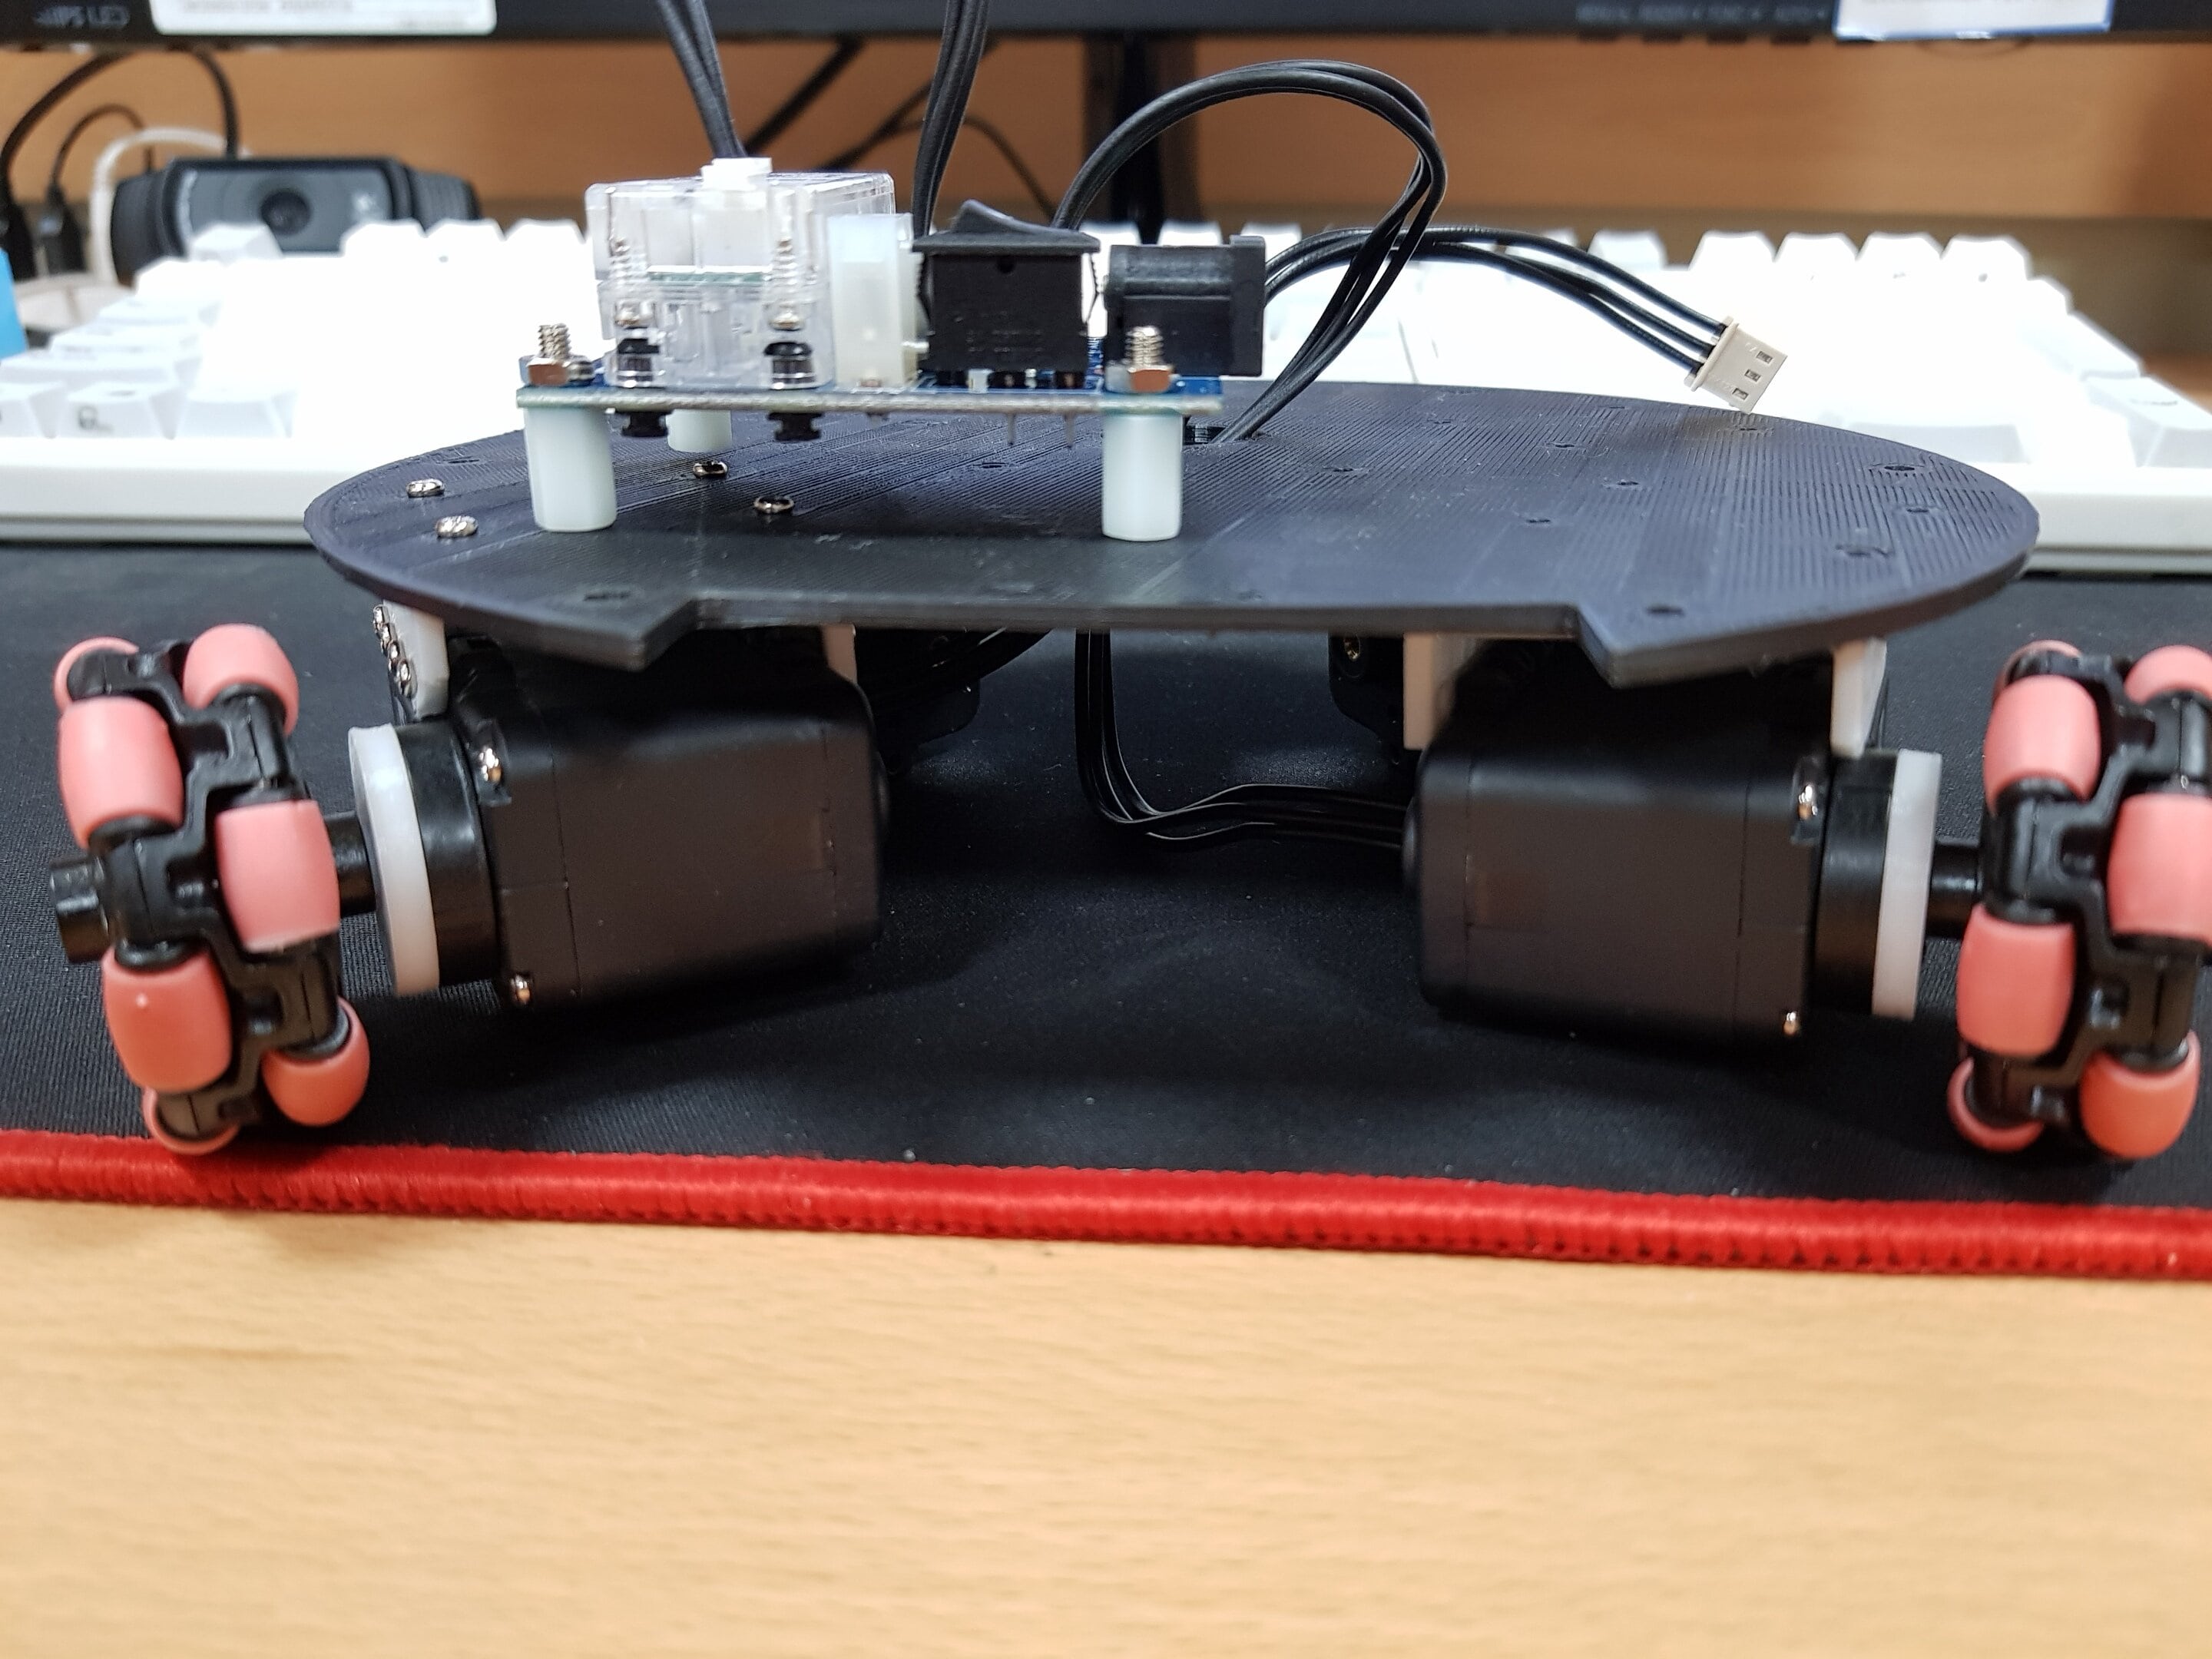
After confirming only the operation of the motor separately, the motor and the control, power board are combined to the robot body.
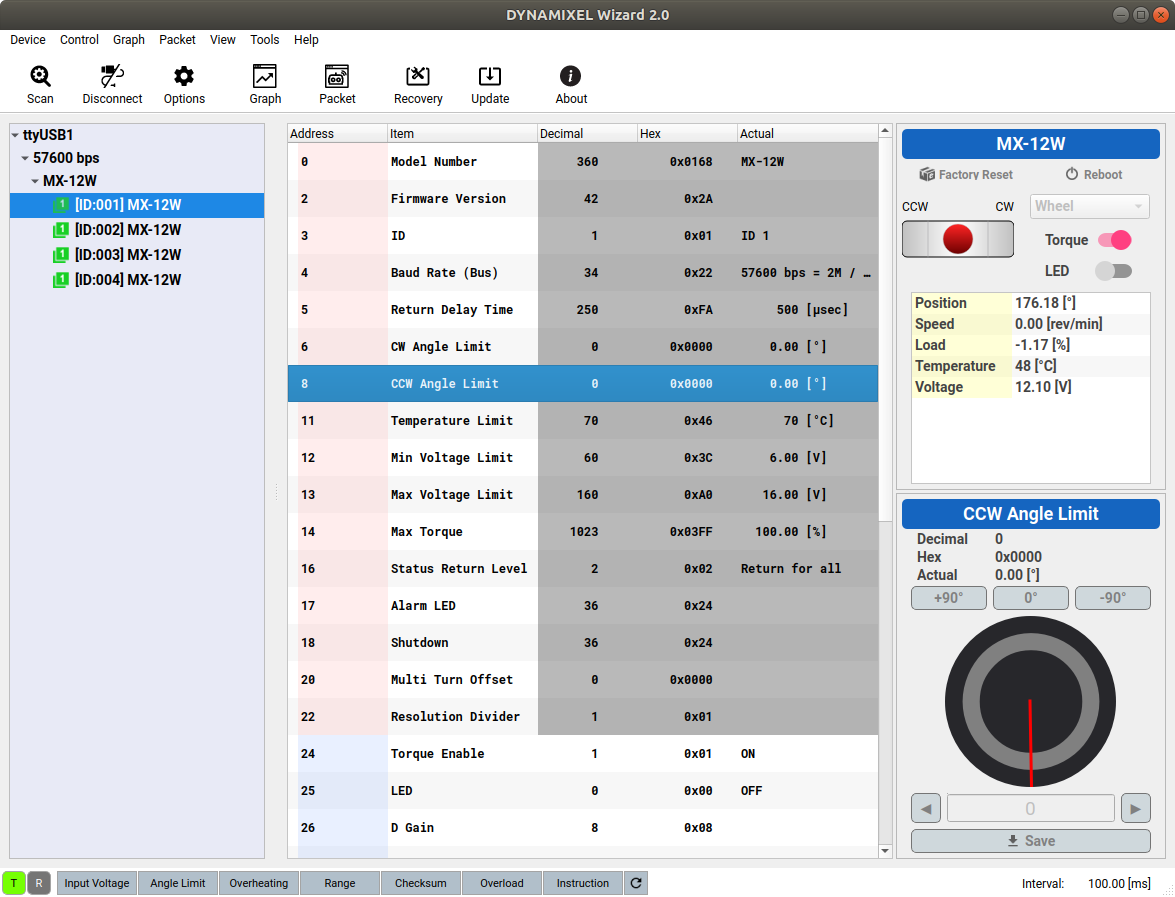
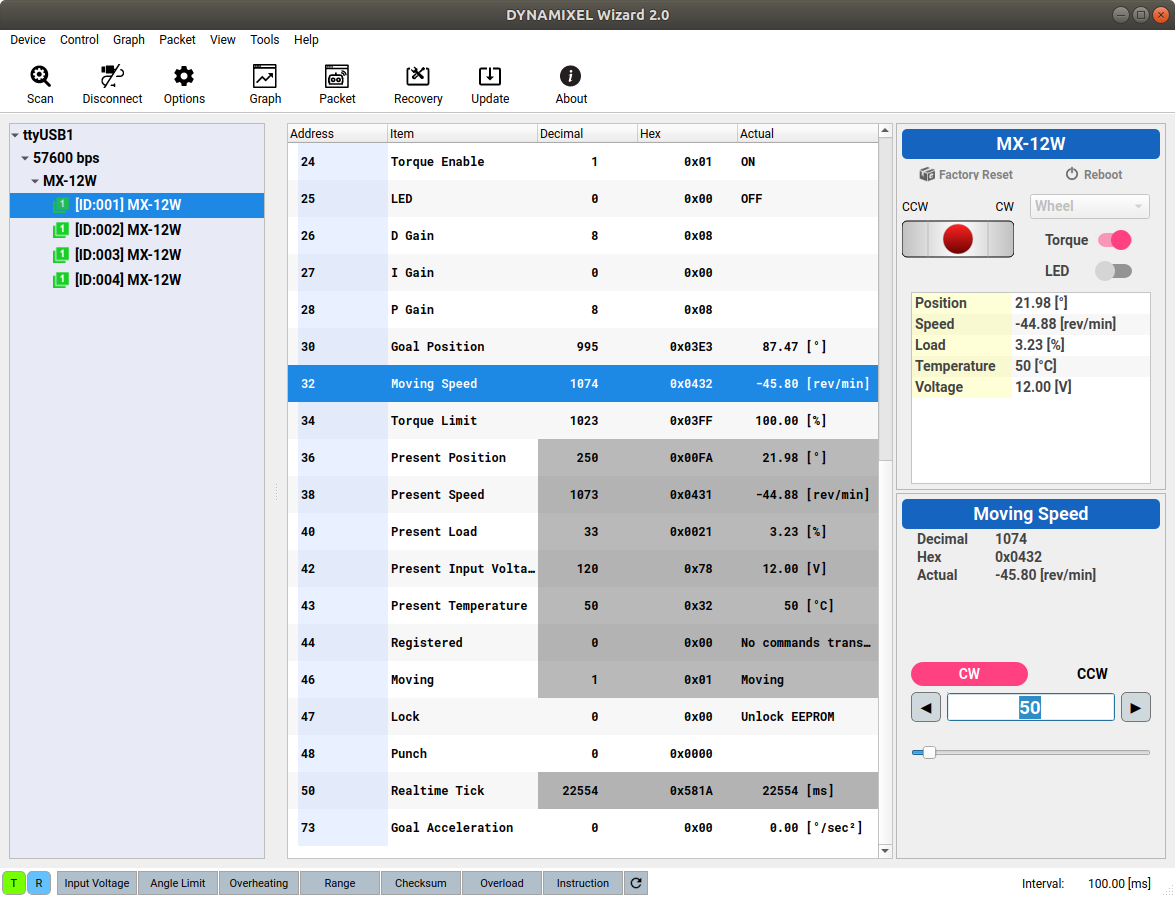
In the case of dynamixel, the initial mode is the joint mode. Mode is needed to be changed to the wheel mode for using soccer robot. This can be achieved by setting the CCW Angle Limit of motor to 0. To rotate the motor set in the wheel mode at a specific speed, you just need to give a specific value to Moving Speed
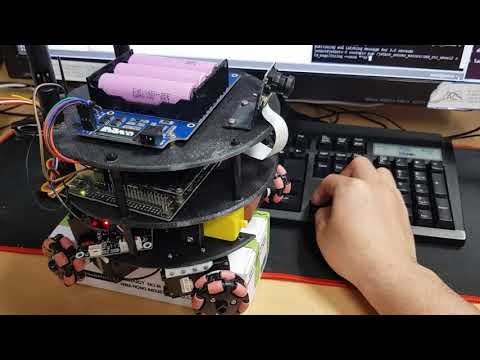
Next, I test adjusting the speed of dynamixel using rostopic, as in the previous Jetbot.
 Click to Watch!
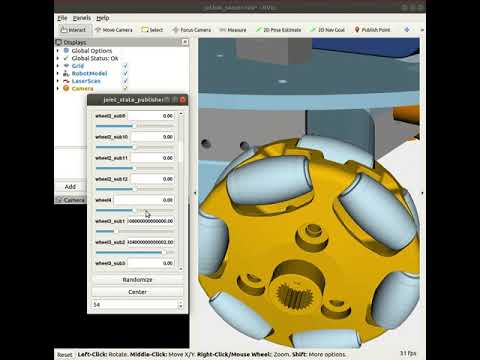
The DeepSoccer uses an omniwheel that has a many sub wheel. In order to properly simulate this with Gazebo, we must make sure that each sub wheel rotates correctly. First, I check it using RViz in the same way as a main wheel.
 Click to Watch!
After completing the test with RVIz, the test is similarly performed with Gazebo. It is confirmed that when the friction with the floor is large, the phenomenon that the sub wheel do not rotate properly is occurred. Finding the optimal friction parameters will be an important task.
 Click to Watch!
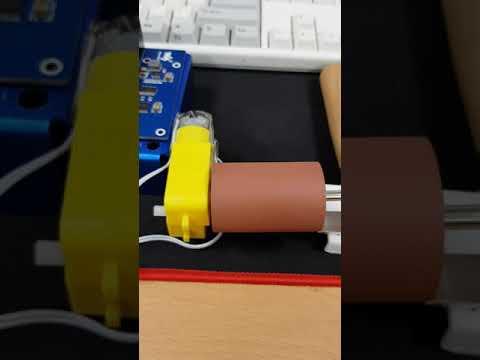
Roller
The mechanism for controlling the ball is composed of a rubber roller for fixing and a solenoid electromagnet for kicking.
For the part for grabiing the soccer ball, I use a part of engraving roller. The core of the roller is made by 3D printer and connected to a DC motor which is included in origin Jetbot.
 Click to Watch!
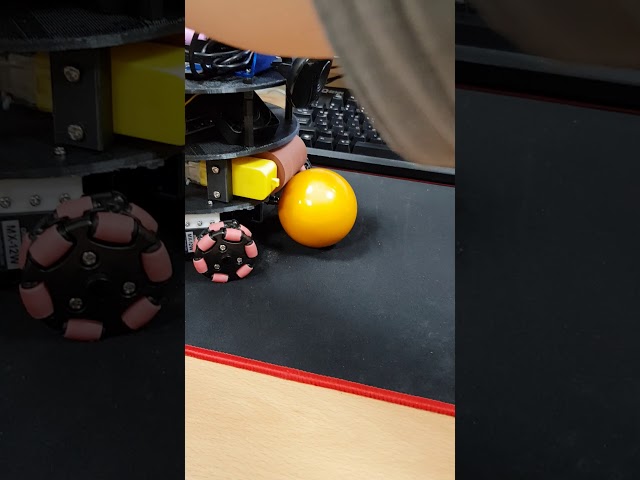
After completing the operation test with the roller alone, it is mounted on the of the robot second body layer. Since then, I test whether robot can actually hold the ball.
 Click to Watch!
Solenoid
For the part for kicking the soccer ball, I use a solenoid electromagnet. To control the solenoid electromagnet in the ROS, we should control GPIO using code. I use a GPIO library of Jetson (https://github.com/NVIDIA/jetson-gpio) provided by NVIDIA.
It is determined that directly connecting the solenoid motor directly to the 12V power supply can not enough force to kick the ball far. Thus, large capacity capacitor and charging circuit for it is added. Thankfully I could find circuit and component for this at https://drive.google.com/file/d/17twkN9F0Dghrc06b_U9Iviq9Si9rsyOG/view.
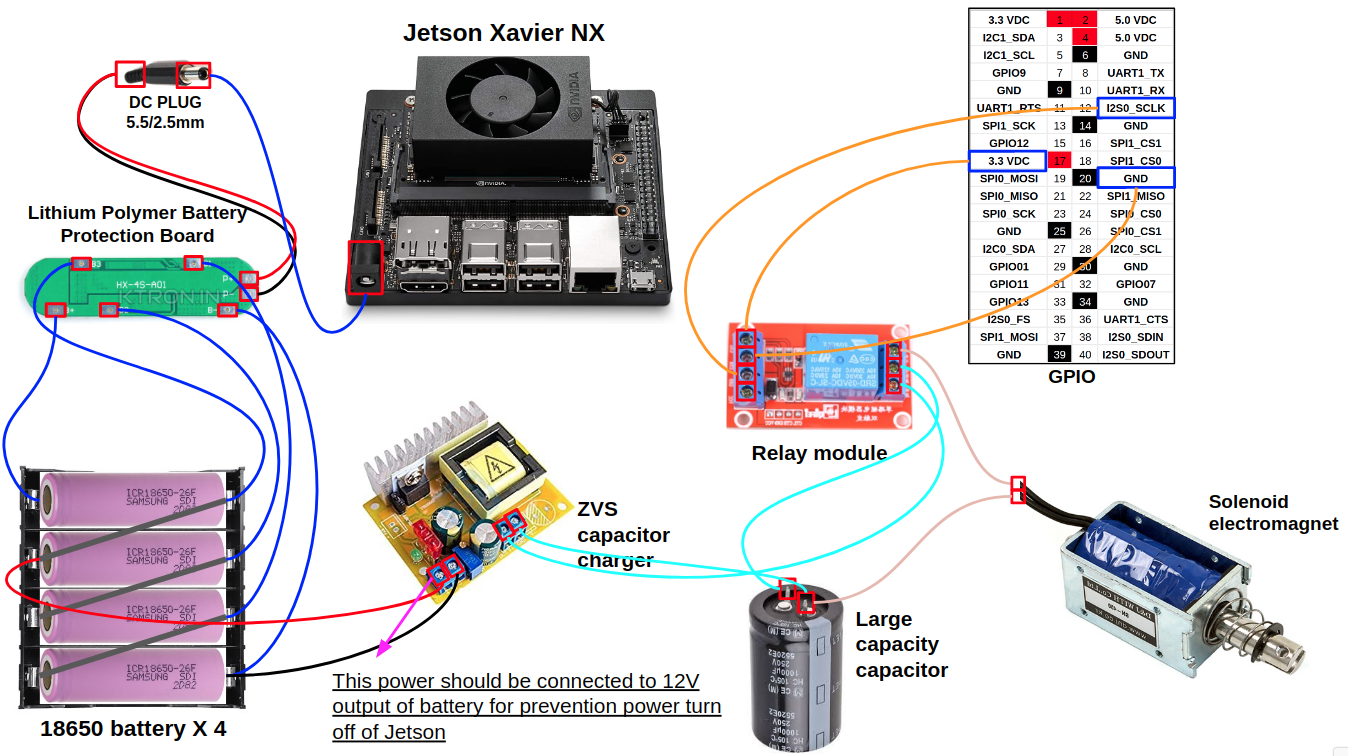
After a 250v 1000uf capacitor and a ±45V-390V capacitor charger are added, a solenoid can push a heavy a billiard ball to considerable distance.
 Click to Watch!
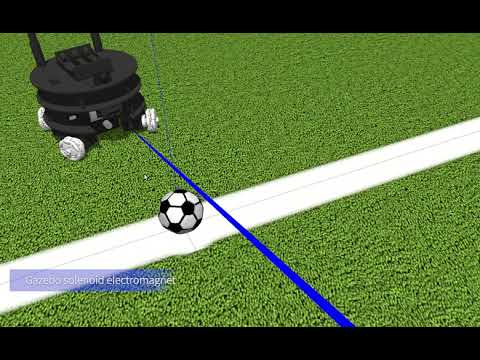
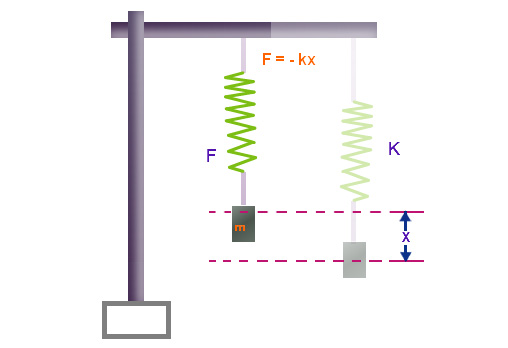
Because the wheel and roller part have all simple structure, they can be implemented using the default controller of Gazebo. However. the solenoid part need a custom controller since it has spring part. You can find a official tutorial for that at http://gazebosim.org/tutorials?tut=guided_i5&cat=.
namespace gazebo
{
	class SolenoidElectromagnetSpringPlugin : public ModelPlugin
	{
		public: SolenoidElectromagnetSpringPlugin() {}
...
...
...

public: void OnRosMsg(const std_msgs::Float32ConstPtr &_msg)
{
	std::cout << "_msg->data: " << _msg->data << std::endl;

	for (int i = 0; i < 10; i++)
	    this->joint->SetForce(0, 1000 * float(_msg->data));
}

protected: void OnUpdate()
{
	double current_angle = this->joint->Position(0);
	for (int i = 0; i < 5; i++)
		this->joint->SetForce(0, (this->kx * (this->setPoint - current_angle)));
}
After testing the tutorial plugin first, add OnRosMsg, OnUpdate function to ModelPlugin. The OnRosMsg function is for receiving message transmitted to rostopic which include force applied to the solenoid by battery. The OnUpdate function is a part for defining a force applied by the spring. You can download plugin file from Solenoid Electromagnet Plugin
<gazebo>
  <plugin name="stick_solenoid_electromagnet_joint_spring" filename="libsolenoid_electromagnet_joint_spring_plugin.so">
    <kx>1000</kx>
    <set_point>0.01</set_point>
    <joint>stick</joint>
  </plugin>
</gazebo>
Adding the above part to deepsoccer.gazebo after defining the plugin can make it possible to use a custom pluging in that joint.
Lidar and Infrared
Soccer robot need to check a obstacle of front side. Using only camera sensor is not enough for that. Thus, I decide adding lidar sensor.
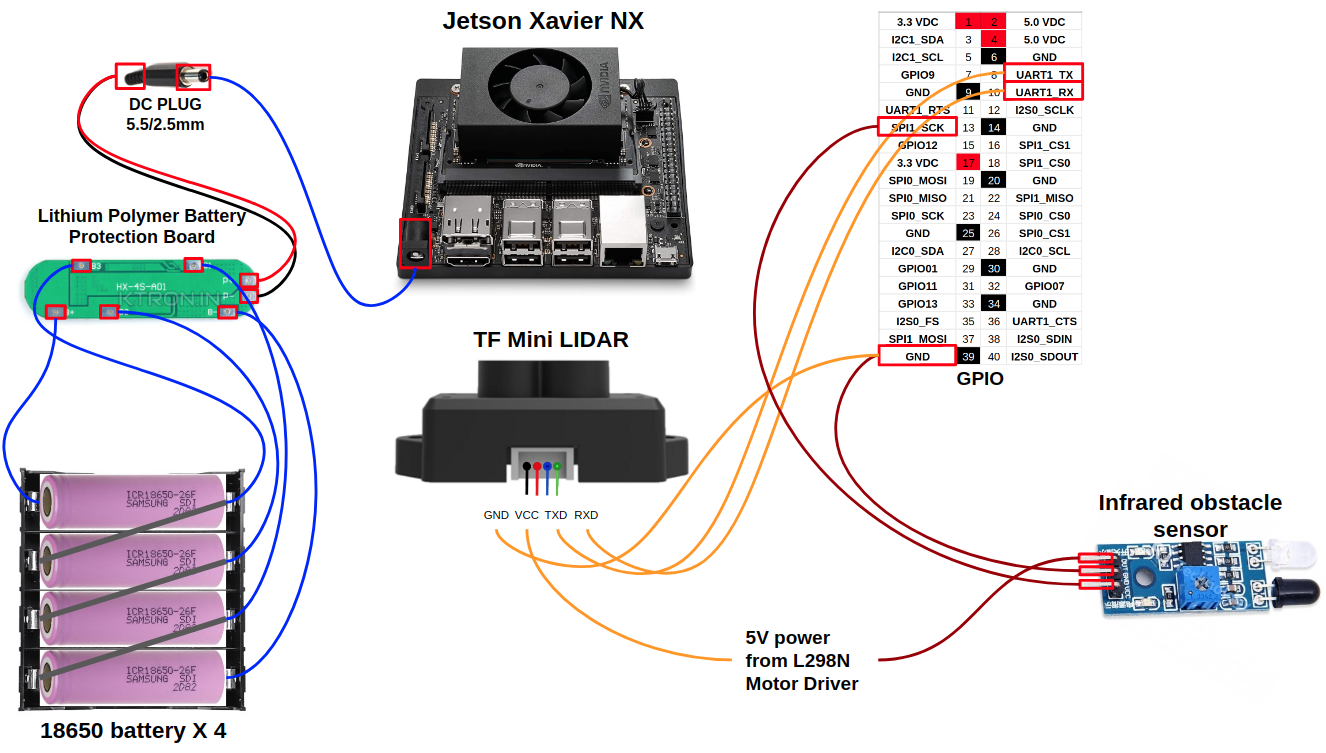
The lidar sensor I use can measure only on the front side. It requires 5V, GND and UART GPIO pins of Jetson Nano.
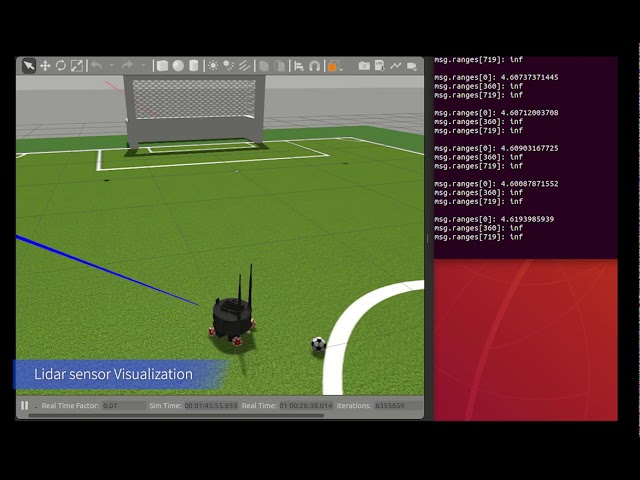 Click to Watch!
After checking operation of lidar sensor at simulation. I also check real lidar sensor can measure distance of front obstacle.
 Click to Watch!
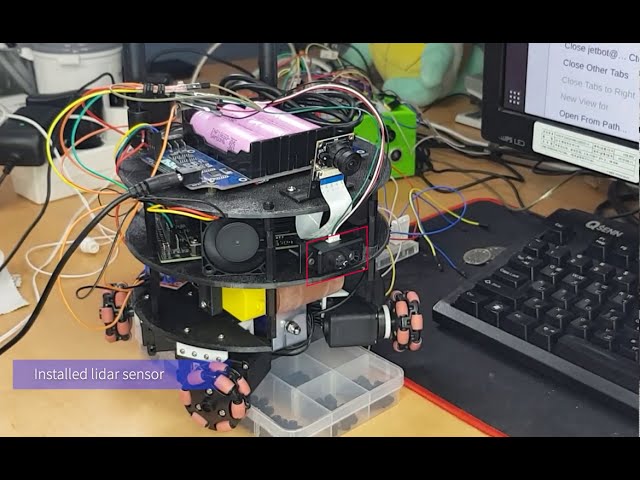
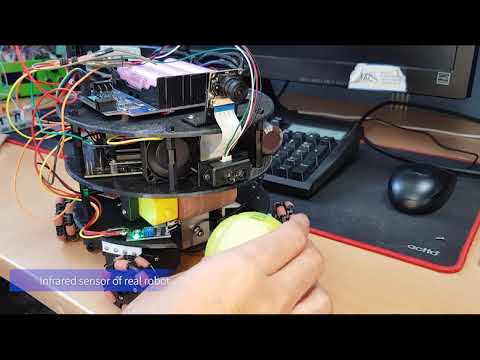
Robot need know it is holding holding ball now because camera can not see a lower part of robot. In order to solve these problems, I decide to add an infrared obstacle detection sensor at side of the roller that holds the ball.
The infrared sensor uses GPIO as an input, as opposed to the solenoid which used GPIO as an output. If an obstacle is detected, the sensor gives a different signal to Jetson Nano.
 Click to Watch!
After mounting the infrared sensor in real robot, I also confirm that the same operation can be performed in infrared sensor of Gazebo simulation.
Teleoperation
It makes sense that the default motions performed in Gazebo simulations can be done in a real robot also. In order to confirm tat, the motion control function of original version of Jetbot using the gamepad is slightly modified for Jetbot soccer version.
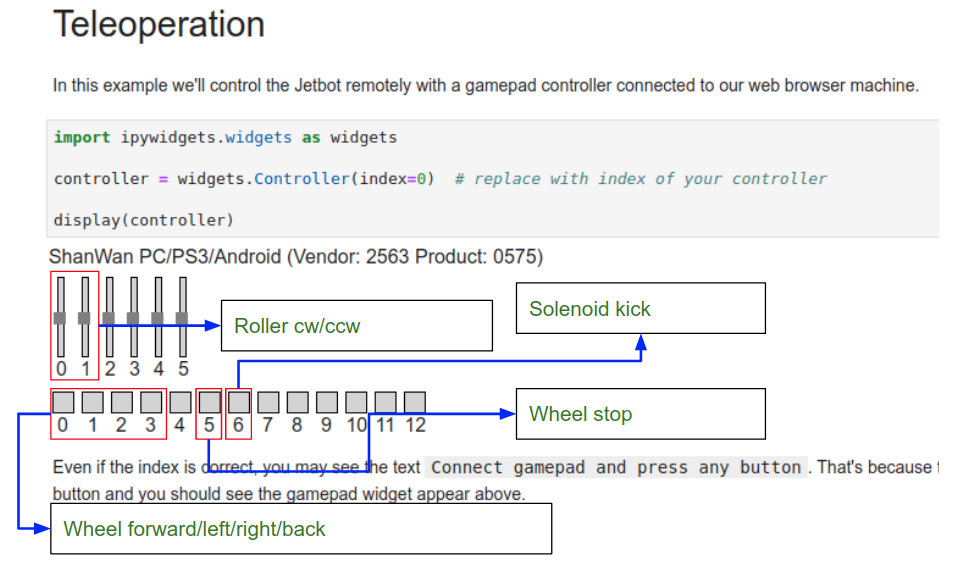
You probably remember the gamepad UI that is in orginal teleoperation.ipynb file. Only 0, 1 scroolbal is used for controlling the left and right wheel in that file. In my case, I set it as above for controlling roller, stick, omniwheel.
from dynamixel_sdk import *                    # Uses Dynamixel SDK library

def omniwheel_move(motor_id, speed):
    # Control table address
    ADDR_MX_TORQUE_ENABLE      = 24               # Control table address is different in Dynamixel model
    ADDR_MX_GOAL_POSITION      = 30
    ADDR_MX_PRESENT_POSITION   = 36
    ADDR_MX_MOVING_SPEED       = 32

    # Protocol version
    PROTOCOL_VERSION            = 1.0               # See which protocol version is used in the Dynamixel

    # Default setting
    DXL_ID = motor_id
    #DXL_ID                      = 1                # Dynamixel ID : 1
    BAUDRATE                    = 57600             # Dynamixel default baudrate : 57600
    DEVICENAME                  = '/dev/ttyUSB0'    # Check which port is being used on your controller
                                                    # ex) Windows: "COM1"   Linux: "/dev/ttyUSB0" Mac: "/dev/tty.usbserial-*"

    TORQUE_ENABLE               = 1                 # Value for enabling the torque
    TORQUE_DISABLE              = 0                 # Value for disabling the torque
    DXL_MINIMUM_POSITION_VALUE  = 10           # Dynamixel will rotate between this value
    DXL_MAXIMUM_POSITION_VALUE  = 4000            # and this value (note that the Dynamixel would not move when the position value is out of movable range. Check e-manual about the range of the Dynamixel you use.)
    DXL_MOVING_STATUS_THRESHOLD = 20                # Dynamixel moving status threshold

    index = 0
    dxl_goal_position = [DXL_MINIMUM_POSITION_VALUE, DXL_MAXIMUM_POSITION_VALUE]         # Goal position

    # Initialize PortHandler instance
    # Set the port path
    # Get methods and members of PortHandlerLinux or PortHandlerWindows
    portHandler = PortHandler(DEVICENAME)

    # Initialize PacketHandler instance
    # Set the protocol version
    # Get methods and members of Protocol1PacketHandler or Protocol2PacketHandler
    packetHandler = PacketHandler(PROTOCOL_VERSION)

    # Open port
    if portHandler.openPort():
        #print("Succeeded to open the port")
        pass
    else:
        print("Failed to open the port")
        print("Press any key to terminate...")
        getch()
        quit()

    # Set port baudrate
    if portHandler.setBaudRate(BAUDRATE):
        #print("Succeeded to change the baudrate")
        pass
    else:
        print("Failed to change the baudrate")
        print("Press any key to terminate...")
        getch()
        quit()

    # Enable Dynamixel Torque
    #dxl_comm_result, dxl_error = packetHandler.write1ByteTxRx(portHandler, DXL_ID, ADDR_MX_TORQUE_ENABLE, TORQUE_ENABLE)
    dxl_comm_result, dxl_error = packetHandler.write2ByteTxRx(portHandler, DXL_ID, ADDR_MX_MOVING_SPEED, speed)
    #print("dxl_comm_result: " + str(dxl_comm_result))
    if dxl_comm_result != COMM_SUCCESS:
        print("%s" % packetHandler.getTxRxResult(dxl_comm_result))
    elif dxl_error != 0:
        print("%s" % packetHandler.getRxPacketError(dxl_error))
    else:
        pass
        #print("Dynamixel has been successfully connected")
# Stop
def stop():
    omniwheel_move(1,0)
    omniwheel_move(2,0)
    omniwheel_move(3,0)
    omniwheel_move(4,0)
import traitlets
from traitlets.config.configurable import Configurable

class OmniWheelStop(Configurable):
    value = traitlets.Float()

    def __init__(self, *args, **kwargs):
        super(OmniWheelStop, self).__init__(*args, **kwargs)  # initializes traitlets

    @traitlets.observe('value')
    def _observe_value(self, change):
        self._write_value(change['new'])

    def _write_value(self, value):
        """Sets motor value between [-1, 1]"""
        stop()

    def _release(self):
        """Stops motor by releasing control"""
        print("_release")
import RPi.GPIO as GPIO
import time

def solenoid_active():
    # Pin Definitions
    output_pin = 18  # BCM pin 18, BOARD pin 12

    # Pin Setup:
    GPIO.setmode(GPIO.BCM)  # BCM pin-numbering scheme from Raspberry Pi
    # set pin as an output pin with optional initial state of HIGH
    GPIO.setup(output_pin, GPIO.OUT, initial=GPIO.HIGH)

    print("Starting demo now! Press CTRL+C to exit")
    curr_value = GPIO.HIGH
    time.sleep(1)

    print("Outputting {} to pin {}".format(curr_value, output_pin))
    GPIO.output(output_pin, curr_value)
    #curr_value ^= GPIO.HIGH
    GPIO.cleanup()

solenoid_active()

class SolenoidKick(Configurable):
    value = traitlets.Float()

    def __init__(self, *args, **kwargs):
        super(SolenoidKick, self).__init__(*args, **kwargs)  # initializes traitlets

    @traitlets.observe('value')
    def _observe_value(self, change):
        self._write_value(change['new'])

    def _write_value(self, value):
        """Sets motor value between [-1, 1]"""
        solenoid_active()

    def _release(self):
        """Stops motor by releasing control"""
        print("_release")
from jetbot import Robot
import traitlets

robot = Robot()

solenoid_link = traitlets.dlink((controller.buttons[4], 'value'), (solenoid_kick, 'value'), transform=lambda x: -x)

roller_link = traitlets.dlink((controller.axes[1], 'value'), (robot.right_motor, 'value'), transform=lambda x: -x)

stop_link = traitlets.dlink((controller.buttons[5], 'value'), (omniwheel_stop, 'value'), transform=lambda x: -x)
forward_link = traitlets.dlink((controller.buttons[0], 'value'), (omniwheel_forward, 'value'), transform=lambda x: -x)
left_link = traitlets.dlink((controller.buttons[1], 'value'), (omniwheel_left, 'value'), transform=lambda x: -x)
right_link = traitlets.dlink((controller.buttons[2], 'value'), (omniwheel_right, 'value'), transform=lambda x: -x)
back_link = traitlets.dlink((controller.buttons[3], 'value'), (omniwheel_back, 'value'), transform=lambda x: -x)
Like the original method, using the gamepad requires combining Traitlets package of python and control code of hardware. Above code is a sample for I use for omniwheel control. First, Dynamixel SDK is used for creating function that gives direction and speed to each omniwheel, and then use these function to create function for the robot to move forward, turn left, turn right, reverse, and stop. Then, using this function, a configurable class of traitlets is created, and the class declared at the end is connected to the gamepad UI using the dlink function of Traitlets.
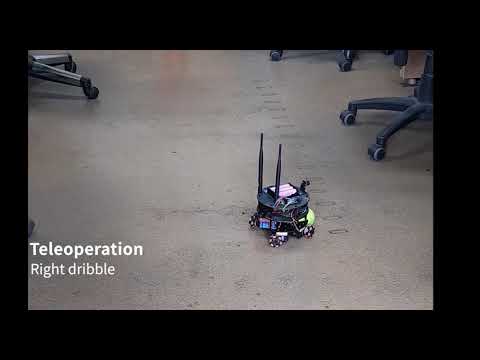 Click to Watch!
As you can see in the video, you can see the basic movement and ball dribbling are working well. However, kicking power is weak. It is considered that voltage , current are insufficient because battery and solenoid are directly connected. To solve these problem, I decide to use the method of collecting the high voltage using a large capacitor and then releasing it to the solenoid at once.
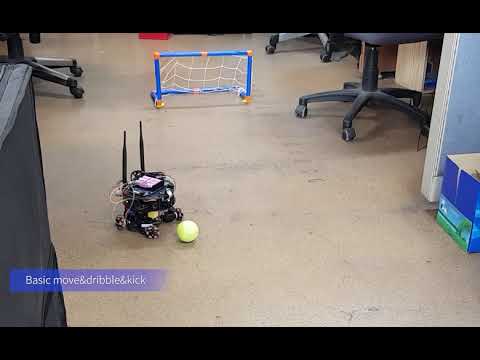 Click to Watch!
I test again basic soccer function after adding a large capacitor. It seems like that the kick function is reinforced and it can kick a balls to a long distance than before.
Environment of DeepSoccer
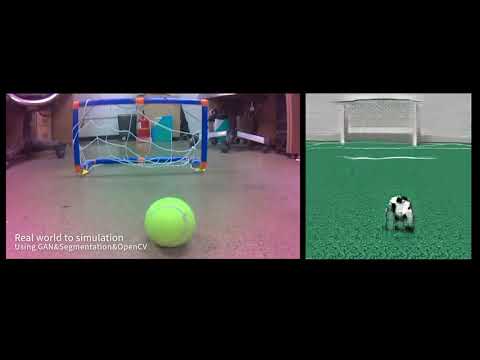
Real and simulation environemnt
A large amount of data is required to train a robot through the Deep Learning method. However, it is not easy to obtain this in a real environment due to physical restrictions. For that reason, this study trains a robot in a virtual environment to play soccer game and then uses that skill in a real environment. However, the skill learned in the virtual environment can not be immediately used in the real environment because there are differences between the virtual and the real environment. In order to solve these problems, we apply a method of generating a virtual environment image from input image of the real environment.
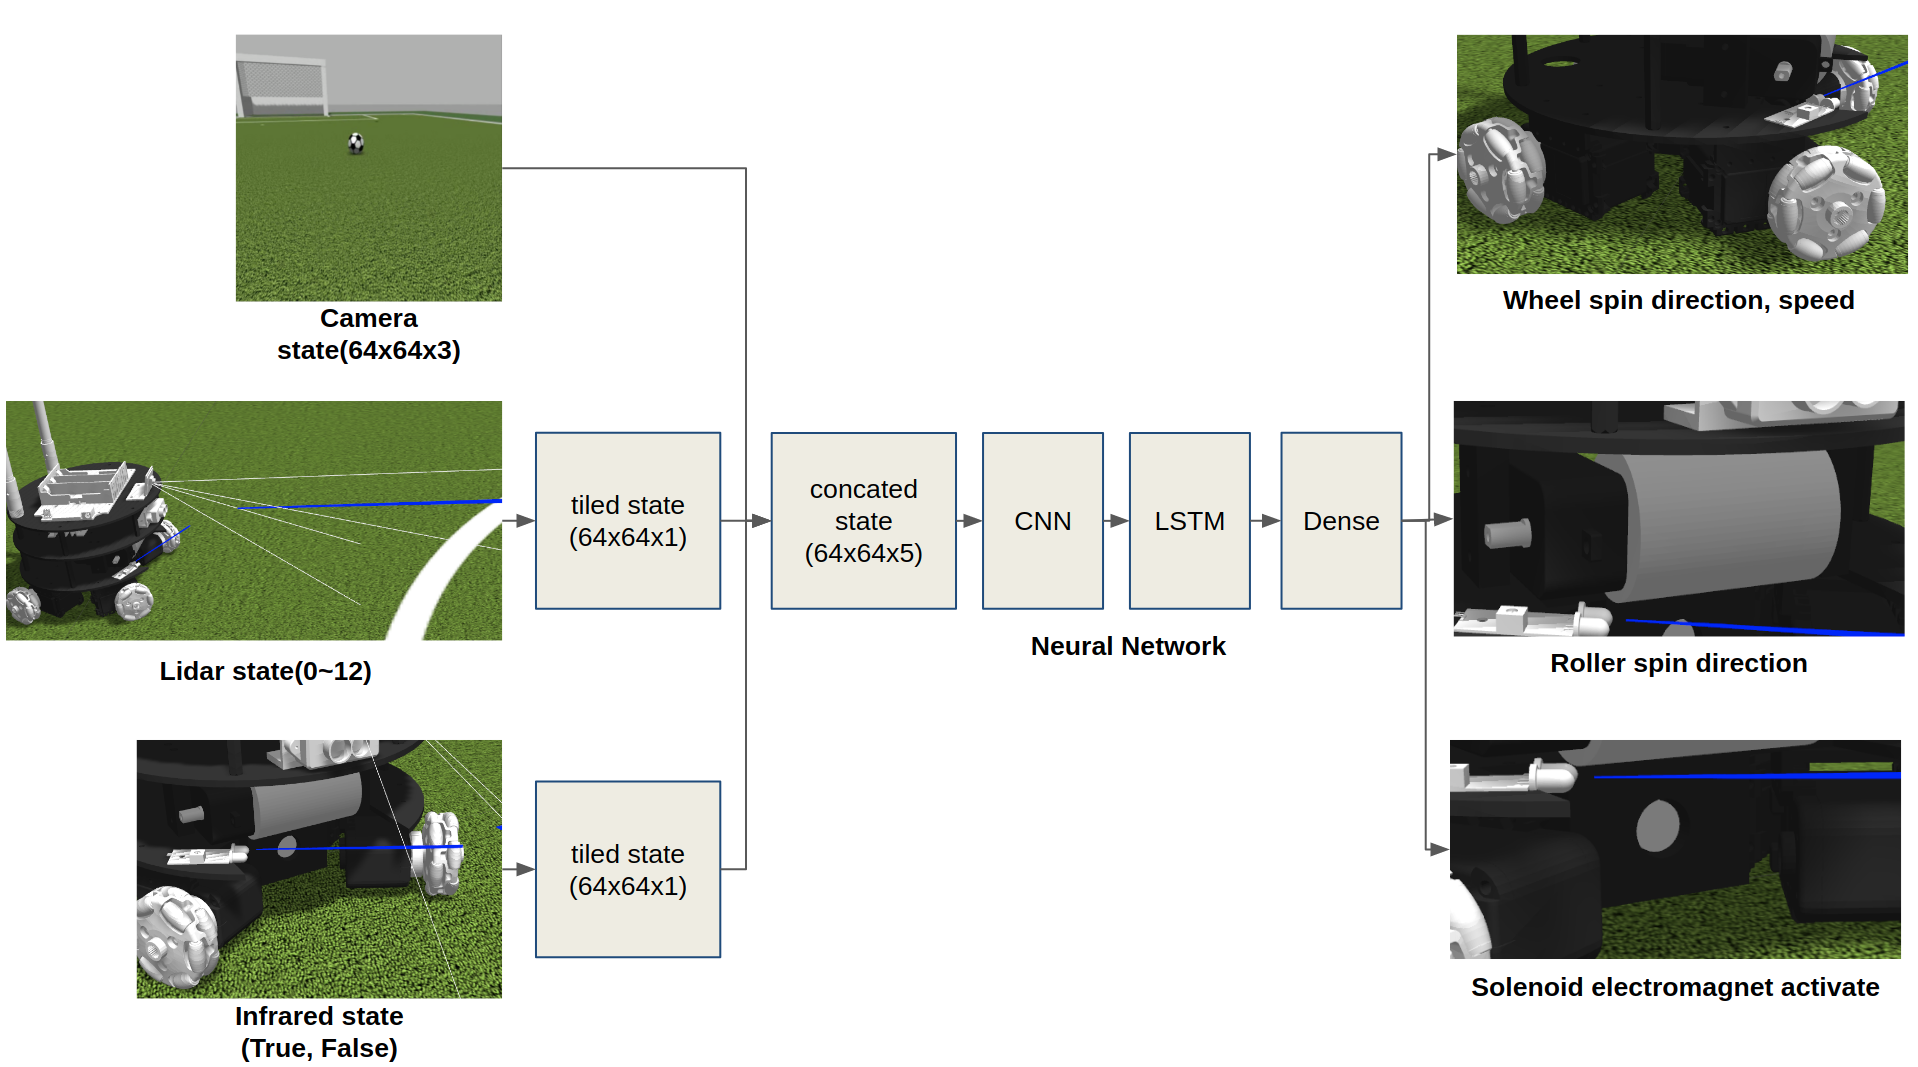
Training robot on simulation environment
Most Deep Reinforcement Learning researchers are accustomed to Gym environment of OpenAI. There is package called openai_ros that allows user use a custom robot environment in the form of Gym.
DeepSoccer also provides a package for use a it as Gym format. That package is based on the my_turtlebot2_training tutorial. I recommend you first running a tutorial package before doing DeepSoccer package.
After finishing TurtleBot2 tutorial, you need to add two file to each folder named task_envs, robot_envs of openai_ros package. One file is deepsoccer_single.py and other file is deepsoccer_env.py. Finally, you should add DeepSoccer environment in task_envs_list.py like below.
    elif task_env == 'MyDeepSoccerSingleTest-v0':
        register(
            id=task_env,
            entry_point='openai_ros.task_envs.deepsoccer.deepsoccer_single_test:DeepSoccerSingleTestEnv',
            max_episode_steps=max_episode_steps,
        )

        # import our training environment
        from openai_ros.task_envs.deepsoccer import deepsoccer_single_test
You can download my own openai_ros package including that files.
Second, download a my_deepsoccer_training pacakge. After that, copy it to the src folder under ROS workspace like a Jetbot package and build it.
Deep Learning of DeepSoccer
DeepSoccer basically is trained in a simulation environment. In this case, Supervised Learning using human expert data, and Reinforcement Learning using reward earned during the game are enough. However, the model trained from simulation environments cannot be immediately used for the actual robot.
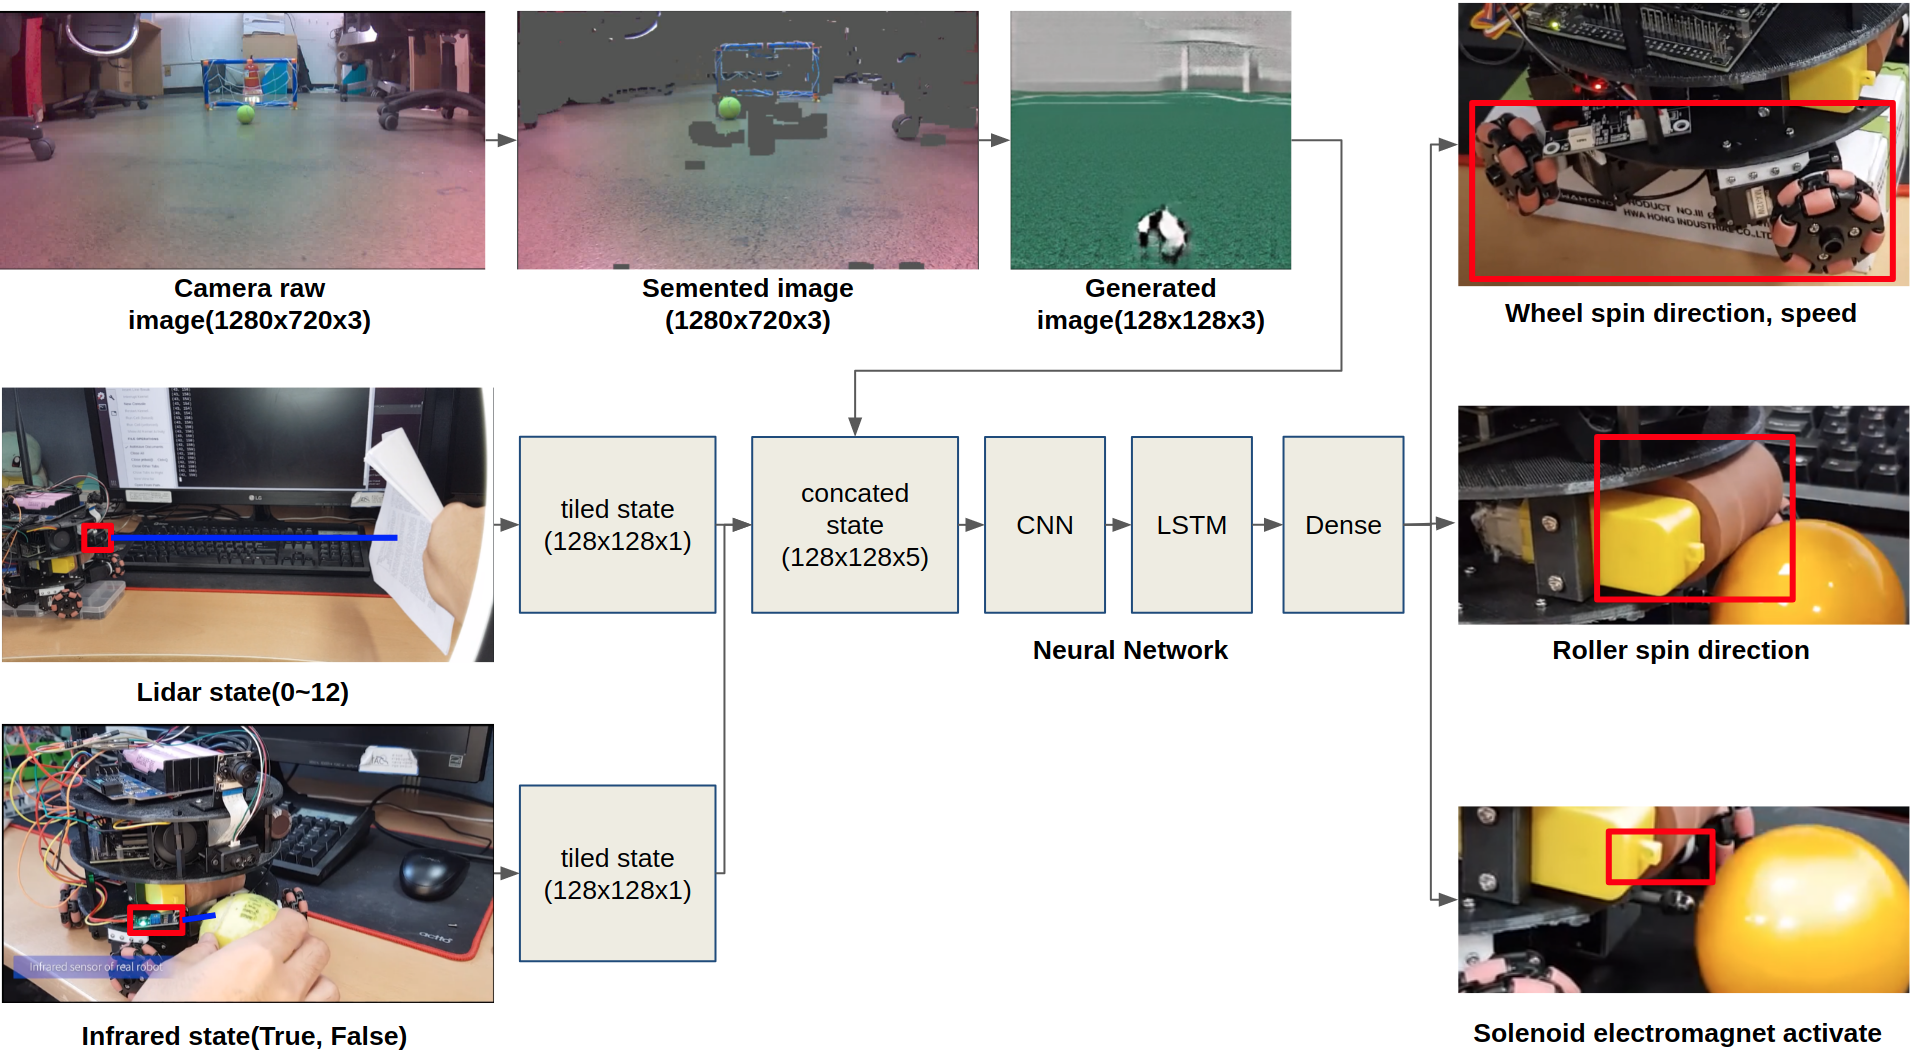
The biggest problem is the camera image. Therefore,segmentation and generation techniques utilizing Neural Networks are added to fill these gap.
Deep Reinforcement Learning
After installing the my_deepsoccer_training package, you can use DeepSoccer with the following Gym shape. The basic actions and observations are the same as described in the Jetbot soccer section. Action is an integer from 0 to 6, indicating STOP, FORWARD, LEFT, RIGHT, BACKWARD, HOLD, and KICK, respectively. Observations are image frame from camera, robot coordinates, and lidar sensor value.
After making DeepSoccer in Openai Gym format, you can use it for training robot by Deep Reinforcement Learning. Currently, the most commonly used Deep Reinforcement Learning algorithms like PPO are good when the action of the agent is relatively simple. However, DeepSoccer agent has to deal with soccer ball very delicately. Thus, I assume that PPO alorithm do not work well in this project. For that reason, I decide to use a one of Deep Reinforcement Learning method “Forgetful Experience Replay in Hierarchical Reinforcement Learning from Demonstrations”, which operates in the complex environment like a soccer, by mixing trained agent data and expert demonstration data.
In addition, it is often difficult to reach the performance of what we want to get only by using Supervised Learning. Therefore, it is necessary to train more using Reinforcement Learning. Currently, it is common to use a multiple environment together for trarning speed such as “Distributed Prioritized Experience Replay”. However, in the case of ROS Gazebo, only one environment can be generated for one OS. Hence, it is necessary to use virtualization technique such as Docker to run multiple environments in one PC.
The structure of the proposed model is like a above picture. Learner is running on the main OS and Actor is running on the on docker OS. Communication between the Learner and the actor is done via ZMQ package of Python. The Learner first is pretrained using human demonstration data. After this work is finished, the Actor start to send the agent data acquired in the environment to the Learner. The number of agent data become larger as training progresses.
import tensorflow as tf
import numpy as np

imported_rl = tf.saved_model.load("/home/kimbring2/Desktop/rl_model")

memory_state = tf.zeros([1,128], dtype=np.float32)
carry_state = tf.zeros([1,128], dtype=np.float32)

f_rl = imported_rl.signatures["serving_default"]
rl_test_input = np.zeros([1,128,128,5])

f_rl(input_1=rl_test_tensor, input_2=memory_state, input_3=carry_state)

memory_state = f_rl(input_1=rl_test_tensor, input_2=memory_state, input_3=carry_state)['core_lstm']
carry_state = f_rl(input_1=rl_test_tensor, input_2=memory_state, input_3=carry_state)['core_lstm_1']
action_logit = f_rl(input_1=rl_test_tensor, input_2=memory_state, input_3=carry_state)['dense_1']
The code related to this algorithm is be located at here.
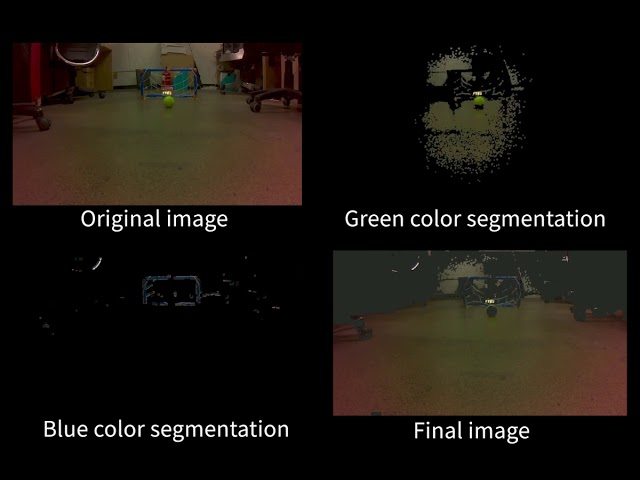
Floor Segmentation
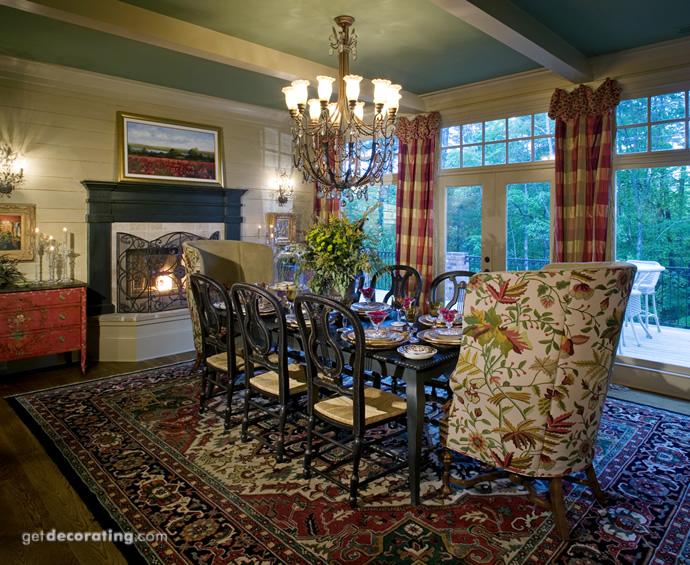
As can be seen in the real world dataset, there are many objects in the background of the experimental site such as chair, and umbrella. If I train the CycleGAN model with the simulation world dataset without removing background objects, I am able to see the problem of the chair turning into goalpost.
In order to solve this problem, I first decide that it is necessary to delete all objects except the goal, goalpost, and floor that the robot should recognize to play soccer. Segmentation using classic OpenCV method do not work. On the other hand, Deep Learning model using the ADE20K dataset can segregate object well. Robot do not have to separate all the object in the dataset. Thus, I simplify the ADE20K dataset a bit like a below.
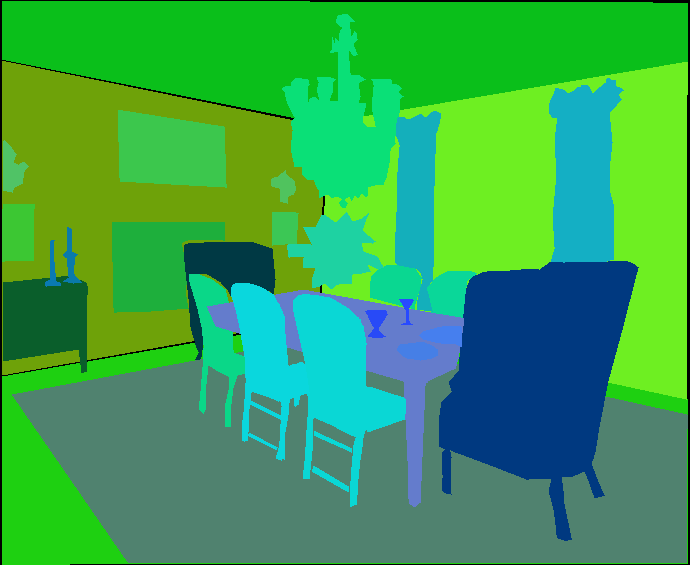
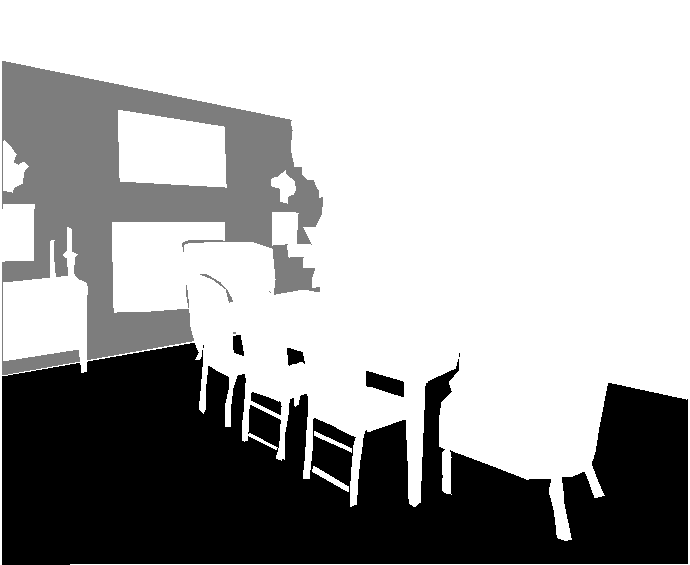
You can check code for segmentation. Furthermore, I confirm that the model trained using modified ADE20K dataset can distinguishe the wall and floor of camera image of real robot.
You can train your own model using code of that repo and simplified image. Altenatively, you can also use the pretrained model of mine and below code.
import cv2
import numpy as np
import tensorflow as tf

imported_seg = tf.saved_model.load("/home/[your Jetson Nano user name]/seg_model")
f_seg = imported_seg.signatures["serving_default"]
seg_test_input = np.zeros([1,256,256,3])
seg_test_tensor = tf.convert_to_tensor(seg_test_input, dtype=tf.float32)
f_seg(seg_test_tensor)['conv2d_transpose_4']

def gstreamer_pipeline(
    capture_width=1280,
    capture_height=720,
    display_width=1280,
    display_height=720,
    framerate=60,
    flip_method=0,
):
    return (
        "nvarguscamerasrc ! "
        "video/x-raw(memory:NVMM), "
        "width=(int)%d, height=(int)%d, "
        "format=(string)NV12, framerate=(fraction)%d/1 ! "
        "nvvidconv flip-method=%d ! "
        "video/x-raw, width=(int)%d, height=(int)%d, format=(string)BGRx ! "
        "videoconvert ! "
        "video/x-raw, format=(string)BGR ! appsink"
        % (
            capture_width,
            capture_height,
            framerate,
            flip_method,
            display_width,
            display_height,
        )
    )

cap = cv2.VideoCapture(gstreamer_pipeline(flip_method=0), cv2.CAP_GSTREAMER)
if cap.isOpened() != False:
    ret, frame = cap.read()
    img = cv2.resize(frame, (256, 256), interpolation=cv2.INTER_AREA)

    img = cv2.normalize(img, None, 0, 1, cv2.NORM_MINMAX, cv2.CV_32F)
    resized = np.array([img])
    input_tensor = tf.convert_to_tensor(resized, dtype=tf.float32)
    output_seg = f_seg(input_tensor)['conv2d_transpose_4'].numpy()

    cv2.imwrite("output_seg.jpg", output_seg)
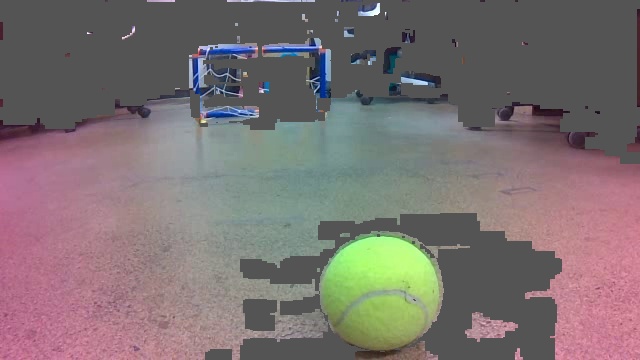
The floor have to be distinguished by the Deep Learning. However, the goal, goalpost have the primary colors such as green, and red. Thus, they can be found through the classic HSV conversion of OpenCV. You can see the original video and the result of applying each method in the video below at once.
 Click to Watch!
you can try to make your own segmented image set for CycleGAN or get of mine from segmented image.
Generative Adversarial Network
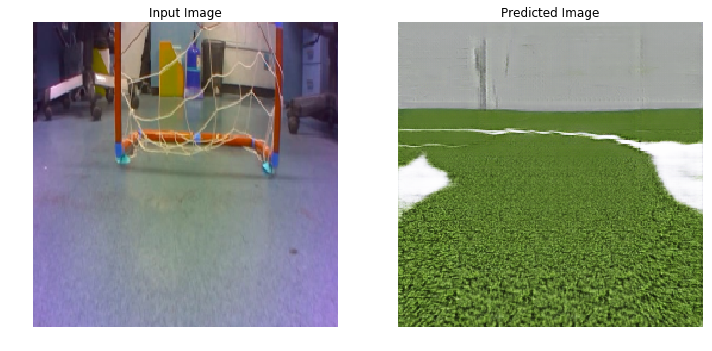
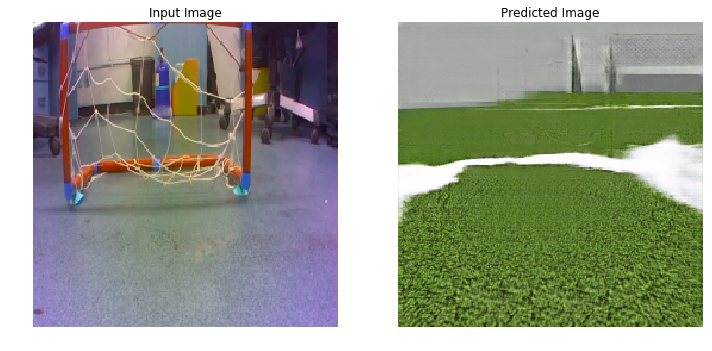
Unlike humans, robots cannot respond appropriately to environment that is different from the simulation environment. Therefore, the real world information must be converted to the simulation environment. Recently, there are several ways to apply deep learning to these Sim2Real. One of method is using Neural Style Transfer and another is applying CycleGAN. I apply both of methods to DeepSoccer and check it is working properly.
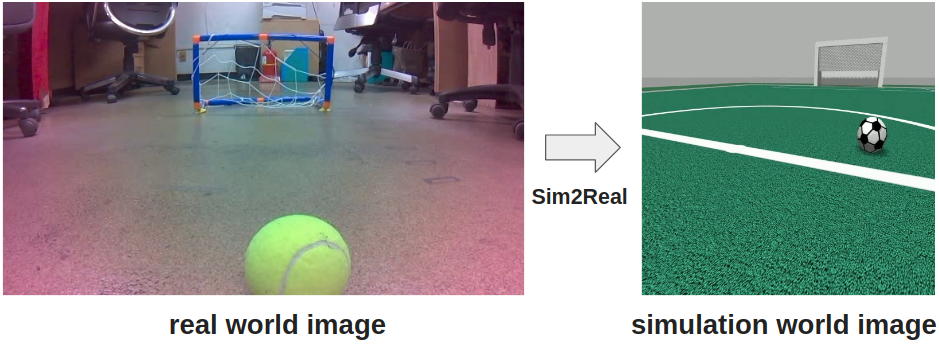
The method using CycleGAN trains a model by dataset of real and simulation world. I find a code for that at method of official Tensorflow website.
 Click to Watch!
Intergration Three Network
If the camera image of the real robot is converted to image of simulation through Segmentation and Generation network, it would be good to use the robot control network trained in simulation.
#!/usr/bin/env python3
############## ROS Import ###############
import rospy
import std_msgs
from sensor_msgs.msg import Image

import numpy as np
import random
import time
import itertools
import os
import cv2
from cv_bridge import CvBridge, CvBridgeError

#import jetson.inference
#import jetson.utils

#net = jetson.inference.detectNet("ssd-mobilenet-v2")

import tensorflow as tf

path_raw_video = '/home/kimbring2/Desktop/raw_video.avi'
path_seg_video = '/home/kimbring2/Desktop/segmentation_video.avi'
path_gen_video = '/home/kimbring2/Desktop/generated_video.avi'
fps = 5
size = (512,512)

raw_video_out = cv2.VideoWriter(path_raw_video, cv2.VideoWriter_fourcc(*'DIVX'), fps, (640,360))
seg_video_out = cv2.VideoWriter(path_seg_video, cv2.VideoWriter_fourcc(*'DIVX'), fps, (640,360))
gan_video_out = cv2.VideoWriter(path_gen_video, cv2.VideoWriter_fourcc(*'DIVX'), fps, (256,256))

imported_rl = tf.saved_model.load("/home/kimbring2/Desktop/rl_model")
imported_seg = tf.saved_model.load("/home/kimbring2/Desktop/seg_model")
imported_gan = tf.saved_model.load("/home/kimbring2/Desktop/gan_model")

f_rl = imported_rl.signatures["serving_default"]
f_seg = imported_seg.signatures["serving_default"]
f_gan = imported_gan.signatures["serving_default"]

rl_test_input = np.zeros([1,128,128,5])
seg_test_input = np.zeros([1,256,256,3])
gan_test_input = np.zeros([1,256,256,3])

rl_test_tensor = tf.convert_to_tensor(rl_test_input, dtype=tf.float32)
seg_test_tensor = tf.convert_to_tensor(seg_test_input, dtype=tf.float32)
gan_test_tensor = tf.convert_to_tensor(gan_test_input, dtype=tf.float32)

memory_state = tf.zeros([1,128], dtype=np.float32)
carry_state = tf.zeros([1,128], dtype=np.float32)

f_rl = imported_rl.signatures["serving_default"]
rl_test_input = np.zeros([1,128,128,5])

print(f_rl(input_1=rl_test_tensor, input_2=memory_state, input_3=carry_state)['core_lstm'].numpy()[0])
print(f_rl(input_1=rl_test_tensor, input_2=memory_state, input_3=carry_state)['core_lstm_1'].numpy()[0])
print(f_rl(input_1=rl_test_tensor, input_2=memory_state, input_3=carry_state)['dense_1'].numpy()[0])

time.sleep(1)
print(f_seg(seg_test_tensor)['conv2d_transpose_4'].numpy()[0])

time.sleep(1)
print(f_gan(gan_test_tensor)['conv2d_transpose_7'].numpy()[0])

bridge = CvBridge()

camera_frame = np.zeros([128,128,3])
step = 0
def image_callback(msg):
    global camera_frame
    global step

    #print("image_callback")
    cv_image = bridge.imgmsg_to_cv2(msg, "passthrough")
    cv_image = cv2.resize(cv_image, (640, 360), interpolation=cv2.INTER_AREA)

    frame = cv_image
    raw_video_out.write(cv_image)

    cv_image_shape = cv_image.shape
    #print("cv_image.shape: " + str(cv_image.shape))
    width = cv_image_shape[1]
    height = cv_image_shape[0]

    cv_image = cv2.resize(cv_image, (256, 256), interpolation=cv2.INTER_AREA)
    cv_image = cv2.normalize(cv_image, None, 0, 1, cv2.NORM_MINMAX, cv2.CV_32F)
    #cv_image = cv2.cvtColor(cv_image, cv2.COLOR_RGB2RGBA).astype(np.float32)

    resized = np.array([cv_image])
    input_tensor = tf.convert_to_tensor(resized, dtype=tf.float32)
    #output = f_cyclegan(input_tensor)['conv2d_transpose_7'].numpy()[0]

    pred_mask = f_seg(input_tensor)['conv2d_transpose_4']
    pred_mask = tf.argmax(pred_mask, axis=-1)
    pred_mask = pred_mask[..., tf.newaxis]
    pred_mask = pred_mask[0]
    pred_mask = tf.keras.preprocessing.image.array_to_img(pred_mask)
    pred_mask = np.array(pred_mask)
    ret, thresh = cv2.threshold(pred_mask, 126, 255, cv2.THRESH_BINARY)

    kernel = np.ones((5, 5), np.uint8)
    erudition_image = cv2.erode(thresh, kernel, iterations=2)  #// make dilation image
    dilation_image = cv2.dilate(erudition_image, kernel, iterations=2)  #// make dilation image
    dilation_image = cv2.resize(np.float32(dilation_image), dsize=(640,360), interpolation=cv2.INTER_AREA)
    dilation_image = dilation_image != 255.0

    # converting from BGR to HSV color space
    hsv_frame = cv2.cvtColor(frame, cv2.COLOR_BGR2HSV)

    # Red color
    low_red = np.array([120, 155, 84])
    high_red = np.array([179, 255, 255])
    red_mask = cv2.inRange(hsv_frame, low_red, high_red)
    red = cv2.bitwise_and(frame, frame, mask=red_mask)

    # Blue color
    low_blue = np.array([110, 130, 2])
    high_blue = np.array([126, 255, 255])
    blue_mask = cv2.inRange(hsv_frame, low_blue, high_blue)
    kernel = np.ones((10, 10), np.uint8)
    blue_mask = cv2.dilate(blue_mask, kernel, iterations=1)  #// make dilation image
    blue = cv2.bitwise_and(frame, frame, mask=blue_mask)

    # Green color
    low_green = np.array([25, 52, 72])
    high_green = np.array([60, 255, 255])
    green_mask = cv2.inRange(hsv_frame, low_green, high_green)
    kernel = np.ones((5, 5), np.uint8)
    green_mask = cv2.dilate(green_mask, kernel, iterations=1)  #// make dilation image
    green = cv2.bitwise_and(frame, frame, mask=green_mask)

    mask = green_mask + blue_mask + dilation_image

    result = cv2.bitwise_and(frame, frame, mask=mask)
    result_mean = np.mean(result)

    indy, indx, indz = np.where((result==0))
    result[indy, indx, indz] = result_mean

    #cv2.imwrite("/home/kimbring2/Desktop/output_seg" + "_" + str(step)+ "_.jpg", result)
    print("result: " + str(result))
    seg_video_out.write(np.uint8(result))

    test_image = result
    test_image = (test_image / 127.5) - 1

    test_tensor = tf.convert_to_tensor(test_image, dtype=tf.float32)
    test_tensor = tf.image.resize(test_tensor, [256, 256], method=tf.image.ResizeMethod.NEAREST_NEIGHBOR)
    test_tensor = tf.reshape(test_tensor, [1,256,256,3], name=None)

    #generate_images(f_gan, test_tensor)
    prediction = f_gan(test_tensor)['conv2d_transpose_7'].numpy()
    print("prediction: ", prediction)

    gan_result = prediction[0]* 0.5 + 0.5
    print("gan_result.shape: ", gan_result.shape)
    cv2.imwrite("/home/kimbring2/Desktop/output_gan" + "_" + str(step)+ "_.jpg", gan_result * 255.0)
    gan_video_out.write(np.uint8(gan_result * 255.0))
    #gan_result = gan_result * 255

    #camera_frame = cv2.resize(cv_image, (128, 128), interpolation=cv2.INTER_AREA)
    camera_frame = cv2.resize(gan_result, (128, 128), interpolation=cv2.INTER_AREA)

    step += 1

lidar_value = 0
def lidar_callback(msg):
    global lidar_value

    lidar_value = msg.data
    #print("lidar: " + str(msg))


infrared_value = 'False'
def infrared_callback(msg):
    global infrared_value

    infrared_value = msg.data
    #print("infrared: " + str(msg))


############## ROS Part ###############
rospy.init_node('deepsoccer')
wheel1 = rospy.Publisher('/deepsoccer_motors/cmd_str_wheel1', std_msgs.msg.String, queue_size=1)
wheel2 = rospy.Publisher('/deepsoccer_motors/cmd_str_wheel2', std_msgs.msg.String, queue_size=1)
wheel3 = rospy.Publisher('/deepsoccer_motors/cmd_str_wheel3', std_msgs.msg.String, queue_size=1)
wheel4 = rospy.Publisher('/deepsoccer_motors/cmd_str_wheel4', std_msgs.msg.String, queue_size=1)
solenoid = rospy.Publisher('/deepsoccer_solenoid/cmd_str', std_msgs.msg.String, queue_size=5)
roller = rospy.Publisher('/deepsoccer_roller/cmd_str', std_msgs.msg.String, queue_size=5)
rospy.Subscriber("/deepsoccer_camera/raw", Image, image_callback)
rospy.Subscriber("/deepsoccer_lidar", std_msgs.msg.String, lidar_callback)
rospy.Subscriber("/deepsoccer_infrared", std_msgs.msg.String, infrared_callback)

rate = rospy.Rate(5000)

stop_action = [0, 0, 0, 0, 'stop', 'none']
forward_action = [50, 1074, 1074, 50, 'in', 'none']
left_action = [1074, 1074, 1074, 1074, 'in', 'none']
right_action = [50, 50, 50, 50, 'in', 'out']
bacward_action = [1074, 50, 50, 1074, 'in', 'none']
hold_action = [0, 0, 0, 0, 'in', 'none']
kick_action = [0, 0, 0, 0, 'stop', 'out']
run_action = [100, 1124, 1124, 100, 'stop', 'out']
robot_action_list = [stop_action, forward_action, left_action, right_action, bacward_action, hold_action, kick_action, run_action]


############## ROS + Deep Learning Part ###############
memory_state = np.zeros([1,128], dtype=np.float32)
carry_state = np.zeros([1,128], dtype=np.float32)
while not rospy.is_shutdown():
    #print("start")

    action_index = 0
    #print("camera_frame.shape: " + str(camera_frame.shape))
    #print("lidar_value: " + str(lidar_value))
    lidar_ = int(lidar_value) / 1200
    print("lidar_: " + str(lidar_))

    #print("infrared_value: " + str(infrared_value))
    #print("type(infrared_value): " + str(type(infrared_value)))
    infrared_ = int(infrared_value == 'True')
    print("infrared_: " + str(infrared_))
    #print("action: " + str(action))
    #print("")

    frame_state_channel = camera_frame
    lidar_state_channel = (np.ones(shape=(128,128,1), dtype=np.float32)) * lidar_
    infrared_state_channel = (np.ones(shape=(128,128,1), dtype=np.float32)) * infrared_ / 2.0
    state_channel1 = np.concatenate((frame_state_channel, lidar_state_channel), axis=2)
    state_channel2 = np.concatenate((state_channel1, infrared_state_channel), axis=2)
    state_channel2 = np.array([state_channel2])
    #print("state_channel2.shape: " + str(state_channel2.shape))

    state_channel_tensor = tf.convert_to_tensor(state_channel2, dtype=tf.float32)
    memory_state = tf.convert_to_tensor(memory_state, dtype=tf.float32)
    carry_state = tf.convert_to_tensor(carry_state, dtype=tf.float32)
    prediction = f_rl(input_1=state_channel_tensor, input_2=memory_state, input_3=carry_state)
    action_logit = prediction['dense_1'].numpy()[0]
    memory_state = prediction['core_lstm'].numpy()
    carry_state = prediction['core_lstm_1'].numpy()
    #predict_value = f_rl(state_channel_tensor)['dueling_model'].numpy()[0].numpy()[0]
    #print("action_logit: " + str(action_logit))
    #print("memory_state.shape: " + str(memory_state.shape))
    #print("carry_state.shape: " + str(carry_state.shape))
    action_index = np.argmax(action_logit, axis=0)
    print("action_index: " + str(action_index))
    action_index = 0
    action = robot_action_list[action_index]

    wheel1_action = action[0]
    wheel2_action = action[1]
    wheel3_action = action[2]
    wheel4_action = action[3]
    roller_action = action[4]
    solenoid_action = action[5]

    wheel1.publish(str(wheel1_action))
    wheel2.publish(str(wheel2_action))
    wheel3.publish(str(wheel3_action))
    wheel4.publish(str(wheel4_action))
    roller.publish(roller_action)
    solenoid.publish(solenoid_action)

    #time.sleep(0.1)

rate.sleep()